
- Tie a t-shirt into a bun knot by gathering fabric through an “O” made with your fingers, or tie up lengths of fabric gathered into “bunny ears.”
- Change the look of your tied t-shirt by moving the knot from the bottom front to the side or back, or higher up on the front.
- Tie the hem of a button-down shirt for a classic option, or tie the sleeves to make a cool tube top, skirt, and more.
T-Shirts

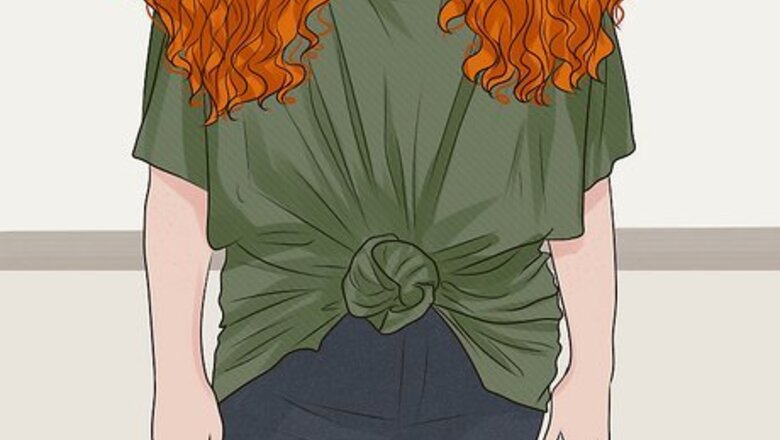
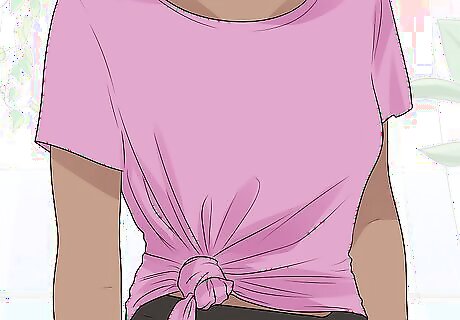
Bun Knot At the bottom center of the shirt, along the hemline, bring your index finger and thumb together to make an “O” shape. Slide the hem of your shirt through the O until the fit is snug around your waist. Tighten your thumb against the fabric, then wrap the tail around your index and middle fingers to form a loop. Pull the tail through the loop, then tug on it to tighten the knot. Tuck the tail end under the knot to hide it, if you like. Use a baggy t-shirt. The longer and looser the shirt is, the more fabric you will have to work with. This will make tying the knot easier.

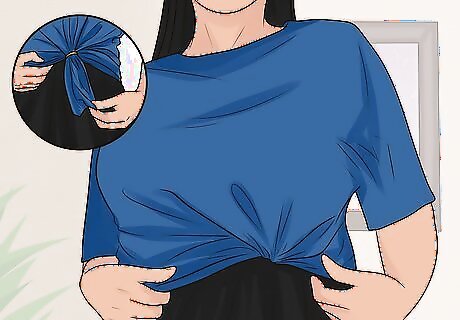
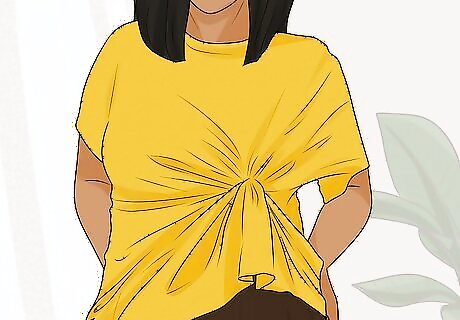
Bunny Ears Knot Gather two sections of your shirt along the bottom hemline, in front of each of your hips, one section in each hand. Cross the left “bunny ear” over the right one, then pull it under and up through the gap—just like tying a pair of shoes. Pull on both “ears” to tighten the knot.

Back Knot You can do either the “bun” or “bunny ears” knot with this one, using the same technique as with a front-side tie. Gather the material and bring it through the “O,” or create a pair of “ears,” then tie your chosen knot against your lower back. Yes, it’s a bit trickier working behind your back, but you’ll get the hang of it with a little practice!
Side Knot Like the back knot, this is another slight variation on the front-side tie that can be used with both the "bun" and "bunny ears" knots. Just locate your gathering point—either for your “O” or the two “ears” on the front side of one of your hips. Tie off the knot and you’re good to go! Tuck the knot up under your shirt to create more of a crop-top look. Belt Loop Variation: Instead of tying the gathered shirt material, feed it through the belt loop of your pants on that side, pointed toward your back. Then, bring the “tail” of material forward and tuck it into your pants near the front. This creates a classy knot feature right along the top line of your pants.
Rubber Band Knot Gather the fabric along your hemline in one hand, like you’re going to do a “bun” knot. Instead of tying the knot, though, just tighten a small rubber band around the gathered fabric, right up against your body. Tuck the loose “tail” of fabric and the rubber band up and under your shirt. You can do this knot in the front, to the side, or in the back. Silk Scarf Variation: After adding the rubber band, tie your favorite silk scarf right over top of it. Tuck the shirt fabric “tail,” the rubber band, and the knot of the scarf under your shirt, leaving the ends of the scarf hanging down. This adds a nice pop of color and visual interest to your look!

Ruffled Front (Visible Knot) Do a “bunny ears” knot here, but instead of gathering the material along the hemline, go partway up the shirt. Gather the two “ears” just about at the bottom of your ribcage on one side, then tie them off as normal. This higher knot causes the fabric to ripple out from an off-center spot in the front of the shirt. This one definitely works best with a loose shirt made of a stretchy material. It’s harder to gather the “ears” higher up on the shirt than along the hemline.
Ruffled Front (Hidden Knot) Make an “O” shape with your thumb and index finger, then put your hand under your shirt, against your stomach to one side of your belly button. Put your other hand under your shirt and use it to pull some fabric through the “O” until the fit is snug. Tighten your fingers around the fabric, then wrap a rubber band or hair tie around it, right up against your fingers. Let go of the fabric when you are done. The tighter you make the shirt, the further up from the hem you'll need to go. You don't want the “tail” (the material you pulled through the “O”) to hang down below your hemline.
Button-Downs
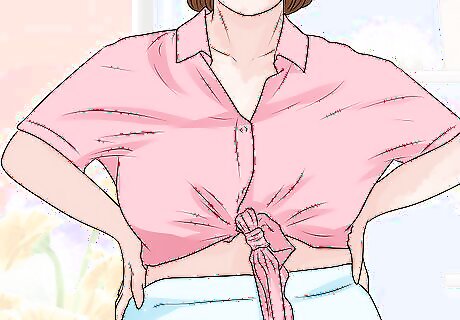
Bottom Knot Put on a short- or long-sleeve shirt, but don't button it yet. Take the 2 bottom corners of the shirt and tie them into a double-knot around your waist—make it as snug as comfortable. Button the shirt up the rest of the way. Alternatively, you can leave the top 1 to 2 buttons undone to show off some cleavage.

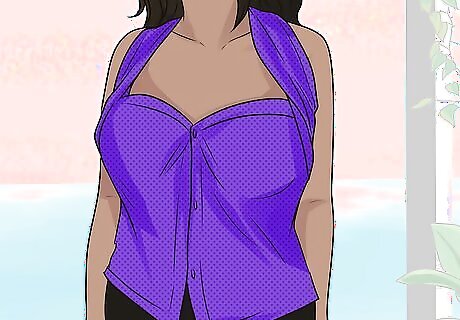
Tube Top Position an unbuttoned long-sleeve shirt against your back, right under your armpits. Starting at about the middle button of the shirt, button it both up and down—the button above the middle button, the button below the middle button, etc.—until the shirt feels snug. Wrap the sleeves around to your front, and tie them into a bow right under your bust. You can leave the collar sticking out against your back or tuck it in. Tuck the shirt into a high-waisted skirt or a pair of high-waisted pants to complete the look.
Halter Top Start this like the tube top—wrap the unbuttoned long-sleeve shirt around you under your armpits, then button it from the center both upward and downward until it feels snug. This time, however, pull both sleeves up in front of your shoulders and behind your neck. Tie them into a sturdy knot. You can leave the collar sticking out, or you can tuck it into the shirt, out of sight. To switch things up a little, position the knot over your left or right shoulder instead of against the back of your neck.
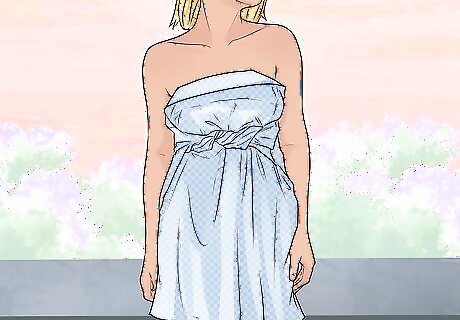
Shirt Dress Use an extra-long/over-sized long-sleeve shirt and start out the same way as the tube top and halter top—wrap the shirt around your chest, under your armpits, and button it until it’s snug. Then, rotate it so that the buttons are in the back and the collar is in the front. Pull the sleeves in front of you, right under the bust/over the stomach, and tie them into a double-knot. Leave the collar out and folded over. It makes a nice design element along the top of the dress. You can use a regular size button-down shirt, but you'll end up with a mini dress instead because of how short it is!
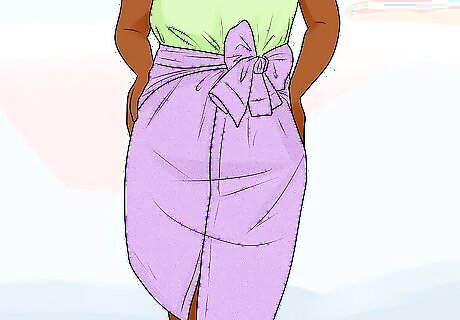
Shirt Skirt Wrap the unbuttoned long-sleeve shirt around your waist so that the collar rests slightly above your hips. Button the shirt downward, starting with the first button from the top that you can comfortably secure. Wrap the sleeves around your waist and tie them into a knot, then a bow. Tuck the collar inside the shirt when you are done.

Waist Wrap Place the front side of an unbuttoned long-sleeve shirt behind your waist, right against your hips. Wrap the sleeves around your waist, then tie them into a double-knot at the front. Make sure that the shirt you use goes well with your outfit. Leave the buttons undone. This will give the shirt a more flattering look. If it gets chilly, you can untie the shirt and put it on!


Comments
0 comment