
Acquire some fabric. You'll need a few yards, depending on your size. An old bedsheet or blanket could be used instead of new fabric. During the Middle Ages, lots of different colors were used, so don't be afraid to buy bright yellow, red, or any other color you choose.

Fold the fabric in half width-wise. Lots of fabric is already folded width-wise when you buy it. Fold it in half again, length-wise this time. Now the fabric should be in fourths. Make sure it is smooth and flat, and the edges are all matched up.
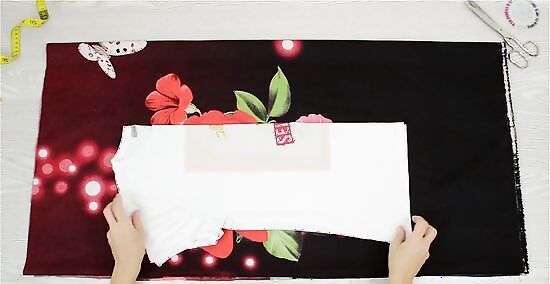
Prepare to trace the pattern on. Use a loose fitting t-shirt to create the pattern. Do not use a tight-fitting shirt, or else you may not be able to get your t-tunic on. Fold the t-shirt in half lengthwise, and lay it on the corner of the fabric so that the fold in the shirt is right up against the fold in the fabric. The top of the shirt should be up against the side of the fabric with two folds.
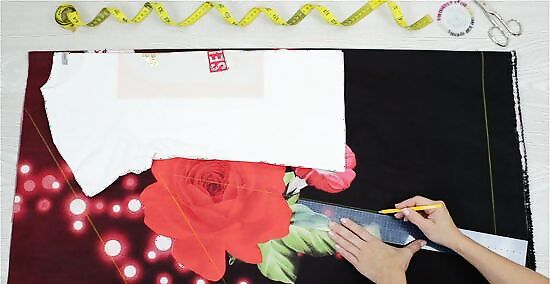
Change the design. You probably don't want your t-tunic to be shaped like the t-shirt. Using the t-shirt as a guide, design the look you want your tunic to have. You can make the neck bigger, the sleeves longer, the sides wider. Most t-tunics are knee-length, but you can make yours shorter or even stretch all the way to your feet. It's common to have the sleeves and bottom flair out a bit. Don't make your design smaller than the t-shirt in any place It will be hard or impossible to get on. Trace on your design with a pencil.
Pin the fabric together along your outline so it doesn't come apart when you begin to cut.

Cut out the outline an inch or two outward from your marks. The extra fabric will be used to make the seam. Don't cut the side or top, where the folds are. When you are done, unpin and unfold the first fold. You should have a single shirt-shaped piece of fabric, folded at the shoulders.

Sew the sides and sleeves together. Be careful not to accidentally sew the arm or neck holes. Make sure you are sewing it inside out if your fabric has a front and back, otherwise your seams will show. To keep the fabric from fraying, sew a hem along the other sections, or at least a simple seam.

Turn your tunic right-side out. Congratulations, it's now complete.


Comments
0 comment