

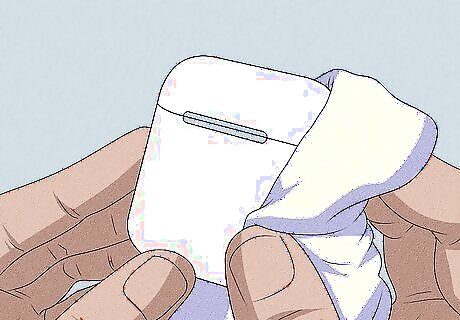
Clean your AirPods.

A buildup of gunk in your AirPods can make them sound muffled. To get them clean, wipe them down with a dry, lint-free cloth. Choose a soft cloth, such as a microfiber cleaning wipe, so you don’t scratch up your AirPods. You can also remove the ear tips, if your AirPods have them, and rinse them in plain water. However, don’t use any soap. Wipe them with a dry microfiber cloth when you’re done, then reattach them to your AirPods after they’re completely dry. If your AirPods have been exposed to any damaging substances, such as hair care products or detergent, wipe them with a cloth very lightly dampened with plain water. Be careful not to get any moisture in the speaker ports or any other openings, and let them dry completely before using them again. For a deeper clean, use a 70% alcohol wipe to clean the outer surface of your AirPods, but take care to keep it away from the speaker mesh. You can also use a bleach-free disinfectant wipe, such as Clorox or Lysol wipes.
Deep-clean the speaker ports.

Earwax can clog your speakers and muffle them. To get the speakers clean, gently wipe the speaker mesh with a dry cotton swab. If you have AirPods Pro or another model with ear tips, pop those off, first. Use a clean, dry, soft-bristled brush, such as a child’s toothbrush, to clean out any remaining stubborn wax or dirt. While you’re at it, you can also use the same technique to clean the microphone ports on the backs of the AirPods. If you’re having trouble getting any gunk or wax out, soften a piece of mounting putty and gently touch it to the dirty surface. The wax will cling to the putty and lift it away from the speaker. Another option is to gently pick out any earwax clinging to the inner edges of the ports with the point of a wooden toothpick. However, be very careful not to scratch or puncture the speaker mesh.
Wipe down the charger case.
Keeping your case clean can prevent dirt buildup in the AirPods. It may also help them charge more reliably. Wipe the case with a clean, dry, lint-free cloth, or lightly dampen the cloth with rubbing alcohol to get off stubborn grime. If you use alcohol, be very careful not to get any in the charging ports, and let the case dry completely before charging your AirPods. If there’s any debris in the Lighting connector, use a dry soft-bristle brush to remove it.
Suck on your AirPod’s speaker grills.

Many AirPod users swear by this method. As gross as it sounds, gently sucking on the large front speaker port on your AirPods may help draw out blockages inside the speaker mesh. Place the tip of the AirPod between your lips and gently breathe in through your mouth. If regular cleaning methods aren’t cutting it, you may want to try this hack as a last resort. Keep in mind that sucking on your AirPods could potentially damage them, especially if you get any saliva inside the speaker port or use too much suction. Use this method with caution. To keep things as hygienic as possible, clean your AirPods both before and after sucking on them. If your AirPods have ear tips, remove those first.
Check your Bluetooth connection.

Interference or a poor Bluetooth connection can reduce sound quality. If your AirPods sound staticky or if you notice the sound cutting in and out, your Bluetooth connection may be the problem. It may help to move closer to your device, move to a less crowded area (especially if you’re around a lot of other Bluetooth users), or turn off wi-fi on your device, since wi-fi signals can also interfere with Bluetooth audio. You’re also less likely to experience static or stuttering while listening to content stored on your device as opposed to streaming audio. If you’ve tried everything and your connection still seems unstable, try unpairing your AirPods from your phone, computer, or other device. Restart the device, then re-pair it with the AirPods. It may also help to turn your device’s Bluetooth connection off and back on again.
Reset your AirPods.

A reset can be a helpful fix for a variety of sound issues. To do it, put your AirPods in their charger case with the lid closed. After 30 seconds, open the lid again. Unpair your AirPods from any devices they’re currently connected to, then hold the setup button on the back of the charger case for about 15 seconds. Watch for the status light to flash orange or amber, then white. When you’re done, reconnect the AirPods to your Bluetooth device. Make sure your AirPods are next to your phone when you reconnect them.
Update your phone, tablet, or computer.
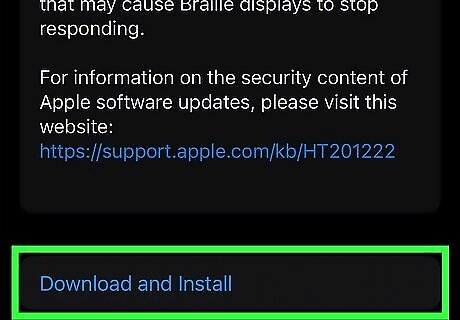
The problem isn’t always with the headphones. Sometimes outdated software or firmware on your device can create connection issues and mess up your sound quality. Make sure your operating system, apps, and drivers are up-to-date, then try your AirPods again.
Get professional service if all else fails.

Apple’s repair pros may be able to fix the problem. They may also replace your AirPods with a new set if they aren’t able to find or repair the cause of the poor sound quality. Take your AirPods to your local Apple Store or Authorized Service Provider, or contact Apple Support to discuss other options. If you’re bringing your AirPods into a store for repair, you’ll need to bring proof of purchase (such as a receipt) or the original box with you. If you choose to contact Apple Support, have your AirPods’ serial number on hand. You can find the serial number printed on the inside of the charging case lid or on the original packaging, next to the barcode. You can also find the serial number by opening Settings on your Apple device, then selecting Bluetooth. Locate your AirPods in the list of devices and tap the Info button Android 7 Info, then scroll to the About section to find the serial number.


Comments
0 comment