
- Uninstall any programs you're not using, and block unnecessary apps and services from starting automatically.
- Visual effects in Windows, like animations, shadows, and transparency, can slow down your PC.
- Using a high-performance power plan optimizes your PC for CPU-intensive applications.
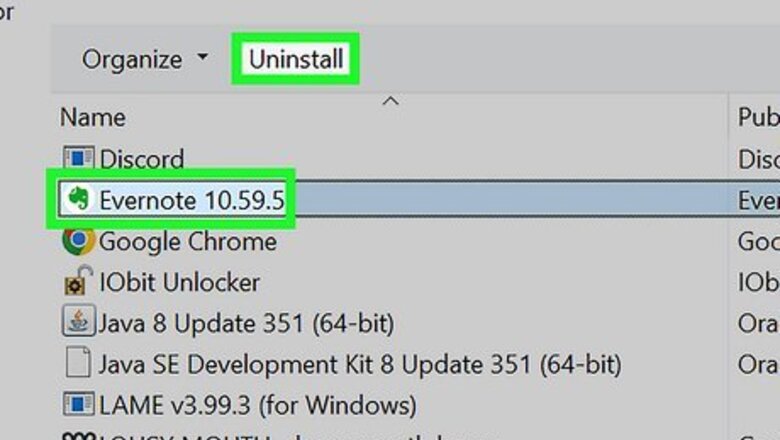
Uninstall programs that bog down your PC.
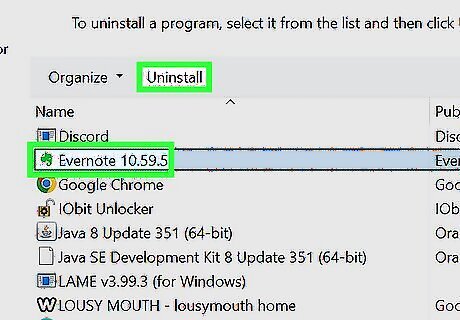
Preinstalled apps and unnecessary programs can decrease performance. If you didn't build your PC yourself, it likely came with lots of extra software (also known as Bloatware) that you really don't need. These programs can also take up space on your hard drive. Windows 11: Go to Start > Settings > Apps. Click the three horizontal dots next to an app, click "'Uninstall'", and follow the on-screen instructions. Windows 10: Go to Start > Settings > Apps > Apps & Features. Select an app. Click Uninstall, and follow the on-screen instructions.
Remove unneeded startup programs.
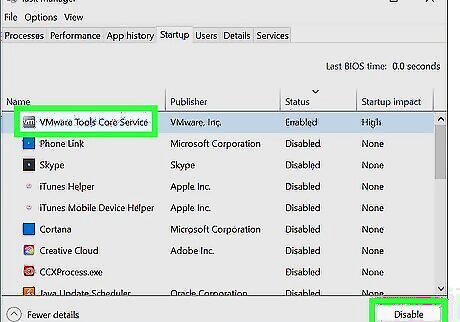
Decrease the number of programs that launch automatically. You'd be surprised how many applications launch each time you restart your PC! This pro optimization technique will not only make your Windows PC start up faster, it'll also make it use less RAM and CPU power during use. Right-click the Start menu. Click Task Manager. Click "'Startup'" (Windows 10) or the meter/gas gauge icon in the left panel (Windows 11). Each startup app has a "startup impact" value that can tell you whether its automatic startup impacts your PC's boot time. For example, if you see "High" next to a startup app, the app uses more than 1 second of CPU time (or more than 3 MB of your disk) each time your PC boots. To stop a program from launching automatically, select it, then click the "'Disable'" button.
Check for updates.
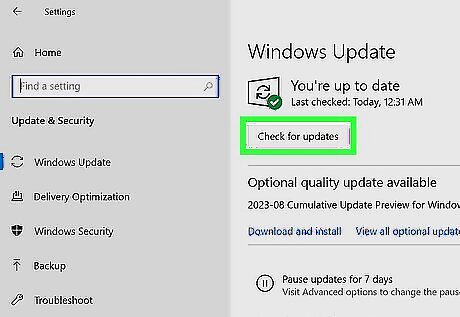
If your Windows PC is suddenly running slow, an update may be needed. Both Windows 10 and Windows 11 check for and download hefty updates in the background, and you won't always know when it's happening. If your computer was running fast earlier and has slowed down to a crawl, run a quick check for updates and install anything pending. Once installed, your computer should speed up again. Windows 11: Go to Start > Settings > Windows Update > Check for updates. Windows 10: Go to Start > Settings > Update & Security > Windows Update > Check for updates.
Disable resource-intensive visual effects.
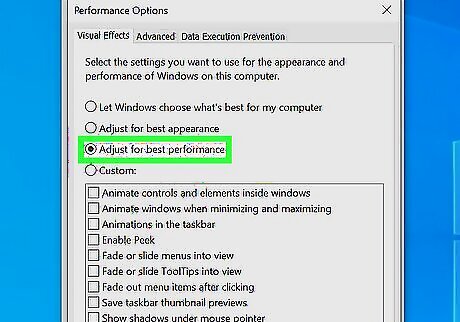
Animations, shadows, and fade-ins/outs can slow down your PC. Turn off these extra visual enhancements for a quick performance boost. Type advanced system into the Windows search bar, then click View advanced system settings. Click Settings… button under "Performance." Select "'Adjust for best performance'" to automatically disable the most resource-intensive effects or turn off effects individually. Click OK and then OK again.
Turn off unnecessary services.
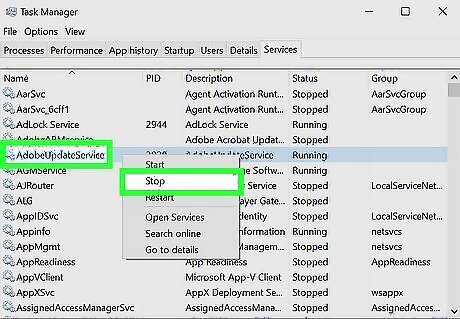
In addition to apps, Windows runs services in the background. Many services are set to launch automatically, while others only launch when required. Some services are crucial to the functioning of Windows, while others are installed by apps and don't need to launch automatically. While most of the Windows-specific services are needed and shouldn't be stopped, there may be other services running that you do not really need. Type services.msc into the Search bar and click Services. Check the "Status" column to see which services are running. Check a service's "Startup Type" value to see if it launches automatically (Automatic) or needs to be started manually (Manual) by the app that uses it. To stop a service, right-click it, then click "'Stop'". To change how a service starts, right-click it, select "'Properties'", and select a startup type from the menu (e.g., "'Automatic'" or "'Manual'"). To disable a service entirely, select Disabled as the startup type.
Use a high-performance power plan.
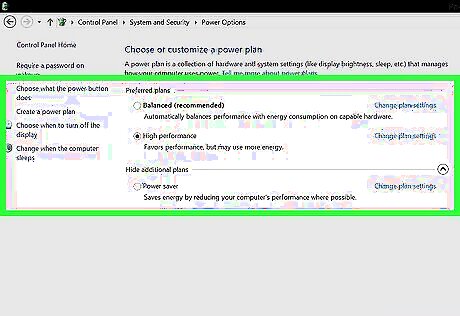
Your PC's power plan may not be suitable for your computer use. Whether you're using a laptop or desktop computer, you can have your PC use less power to conserve energy. This comes in handy, especially when using a laptop that isn't connected to a power source. However, because these energy-efficient power plans decrease your processor speed, they can slow down your PC. For the best performance possible, follow these steps to switch to the high-performance power plan: Open"' Control Panel'". Go to System and Security > Power Options. Select High performance. To configure an Existing Plan, you can click Change plan settings to choose your own custom options.
Optimize and defragment your hard drive.

Use the Optimize tool in Windows to defragment and optimize your hard drive. If you have a hard drive (HDD), defragmenting it regularly is a good way to keep your drive speedy. If you have a solid-state drive (SSD), there's no need to defragment, but you can still run the Optimize tool to analyze your drive and make helpful optimizations. Type defrag into the Windows Search bar. Click "'Defragment and Optimize Drives'". Select your hard drive and click Optimize. If you have multiple partitions, click Advanced view to view them all. Then, select each partition and click "'Optimize'".
Use Game Mode when you're gaming.
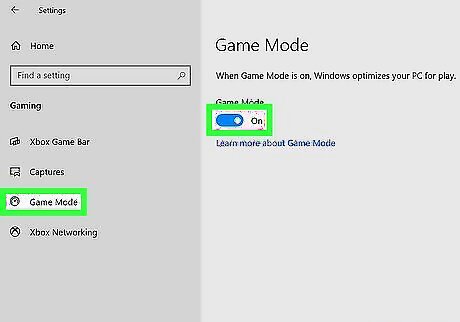
To optimize your PC for gaming, turn on gaming mode. Gaming mode prioritizes your game over other processes, prevents Windows Update from running in the background, and helps improve your frame rate. To turn on gaming mode: Click the Start menu and select Settings. Click Gaming. Toggle "Gaming mode" to the On position.
Pause OneDrive syncing when you need a power boost.
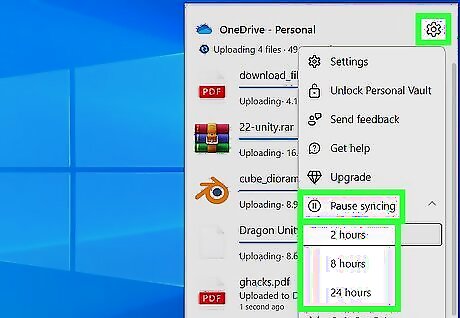
If your computer slows down when gaming or streaming, pause OneDrive. When OneDrive is constantly syncing your data to the cloud, it not only uses your PC's resources but may also slow down your internet speeds. Disabling it temporarily is a great way to optimize your PC during gameplay, while downloading, or doing anything else that requires faster internet speeds and more processing power. Right-click the OneDrive icon in the system tray. Click Pause syncing. Choose how long to pause OneDrive.
Consider a RAM upgrade.
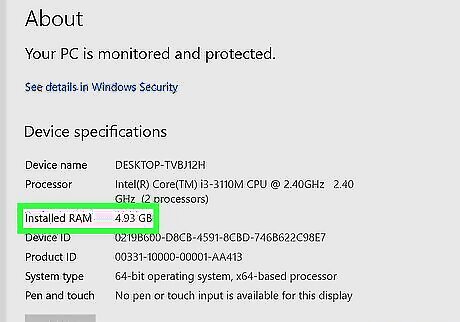
If your PC is upgradable, add more RAM. Most new PCs come with 8 GB of RAM, which is great for light use. If you're a gamer, designer, video editor, or do anything else that's memory-intensive, adding RAM will usually help speed up your computer's performance. To see how much RAM your computer has, type system into the Windows search bar, click"' System Information'", and scroll down to "Installed Physical Memory (RAM)." You can use Crucial's upgrade tool to see how much RAM your PC supports and determine which type of RAM you'll need. Head over to https://www.crucial.com/upgrades to check it out.
Use ReadyBoost if you can't add RAM.
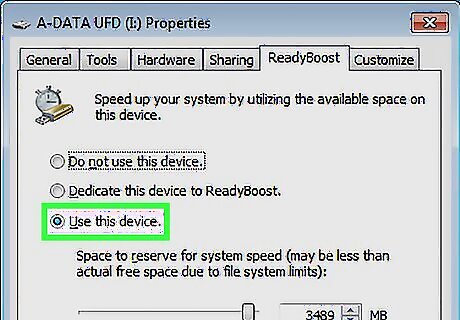
ReadyBoost lets you use a removable drive as virtual RAM. You'll need a standard hard drive (HDD) to use this optimization feature on your PC, as it won't work on solid-state (SSD) drives. You'll also need a USB flash drive, memory card, or external hard drive with at least 500 MB of available space. To turn on ReadyBoost, insert the drive or flash card. Open File Explorer. Click This PC in the left panel. Right-click the removable drive and select Properties. Click the ReadyBoost tab and select Use this device.
Use Defender to scan for viruses and malware.
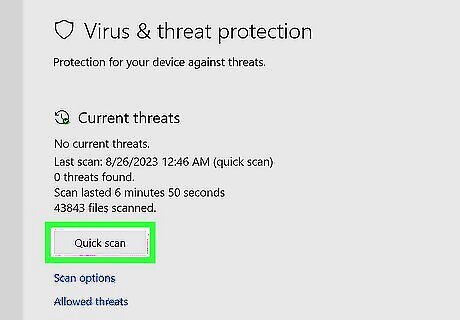
Windows 10 & 11 come with free and effective antivirus protection. While many computer manufacturers install third-party apps like Kaspersky, McAffee, and Symantec on new computers, these programs are not as efficient as Microsoft Defender. Defender runs in the background and checks for viruses and malware regularly, but you can always do a manual scan if you're running into performance problems or are worried you have a virus. Type security into Windows Search and click Windows Security. Click Virus & threat protection. Click Quick scan to run a speedy scan, or Scan options for more in-depth scans.
Use Disk Cleanup to delete temporary files.
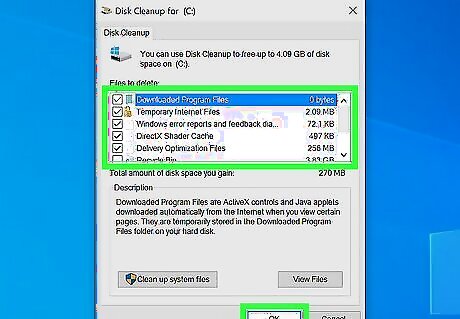
Disk Cleanup can help you identify and remove unnecessary files. As you use the programs on your PC, applications create temporary files to help them perform tasks and run better. These files are sometimes deleted automatically, but many remain until they're deleted. Loading your hard drive with many temporary files can take up precious disk space and decrease performance. Fortunately, Disk Cleanup makes deleting them on Windows 10 and 11 easy. Type cleanup into the Windows Search bar and click Disk Cleanup. Check the boxes next to the files you want to delete, such as "Temporary files" and "Delivery Optimization Files." Click OK and then Delete Files. To free up even more space, re-open Disk Cleanup and click "'Cleanup system files'". Select which unneeded system files you want to delete. Click OK and then Delete Files.
Let Windows manage your paging file.
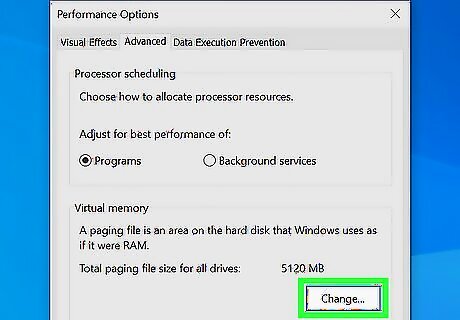
Automatic page file management can improve your PC's performance. The paging file is a file on your hard drive that Windows can use like RAM. If Windows is set to manage this file automatically, it will optimize how the file is used to match your system hardware. Type advanced system into the Windows search bar and click View advanced system settings. Click Settings in the "Performance" section. Click the Advanced tab. Click the Change button. Check the box next to "Automatically manage paging file size for all drives" if not selected, and click "'OK'". Restart your PC.
Enable Fast Startup to speed up boot time.
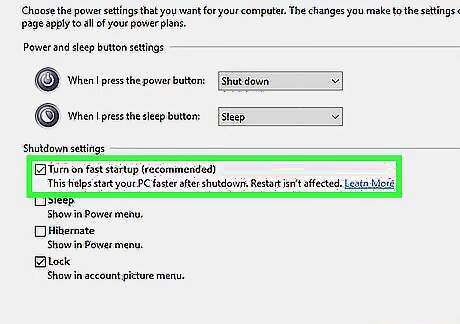
If your PC takes a long time to boot, Fast Startup can help. Windows 10 and 11 offer this nifty feature to speed up your computer's boot time. When you shut down your PC with Fast Startup enabled, it will go into a mix of Hibernate and Sleep states instead of truly turning off. This helps your PC boot faster the next time you turn it on. This won't affect reboots, but it will save time when you press the power button to turn off your PC. Type control panel into Windows Search and click"' Control Panel'". Click System and Security. Click Power Options. Click"' Choose what the power buttons do'". Check the box next to "Turn on fast startup." If it's grayed out, click "'Change settings that are currently unavailable'" at the top first. Click Save changes.
Edit your indexing options.
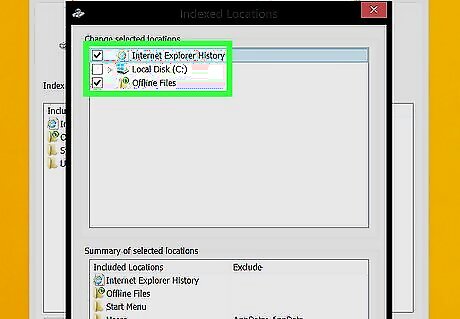
Windows constantly updates files and folders to return fast search results. While this is convenient and speeds up your Windows searches, it might slow down your PC overall, especially if you don't use Windows Search often. Disabling indexing altogether is not a good idea, but you can control which files are indexed to optimize your PC performance. Type indexing into the Windows Search bar. Click Indexing Options. Click the Modify button. Uncheck the locations that you do not want to be indexed. This can be any folders you don't commonly search for files and apps. On the General tab, uncheck the box that says, "Allow files on this drive to have contents indexed". If you have an entire drive that you want to remove from indexing: Open File Manager. Click This PC. Right-click the drive and select Properties. Remove the checkmark from "Allow files on this drive to have contents indexed in addition to file properties" and click "'OK'".


Comments
0 comment