
Parts of a Sewing Machine
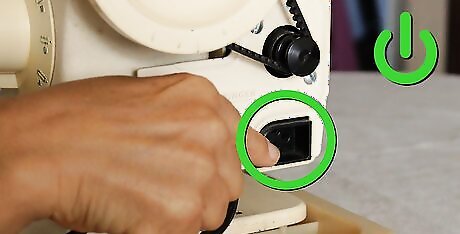
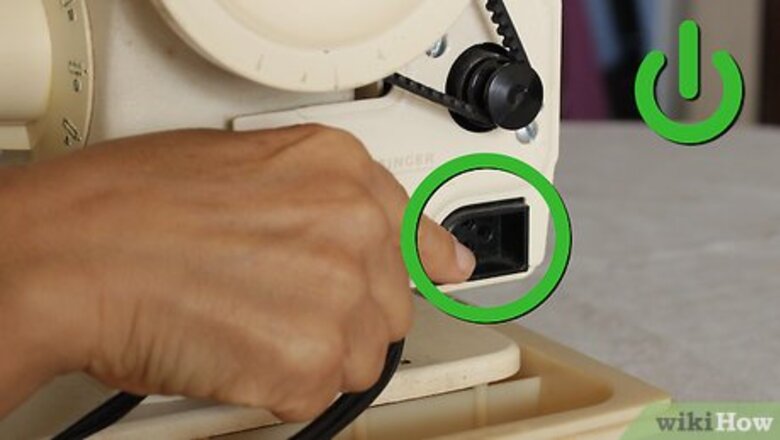
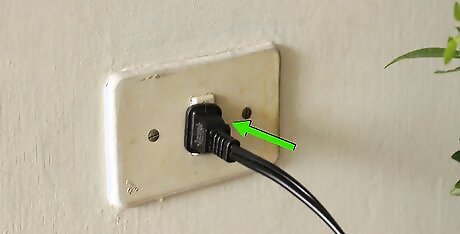
Find the power switch and power cord (if separate). It may seem silly, but locating the power switch is the most important step! This is located in different places depending on the sewing machine you have, but is normally on the right side of the body or in the back. Depending on your model, a small light above the needle may turn on to indicate the machine is powered on. Some sewing machines do not have a power switch and instead turn on as soon as they’re plugged in. Some models also have a detachable power cord. If yours does, look for a port on the sides or back of your machine that matches the non-outlet end of your power cord.
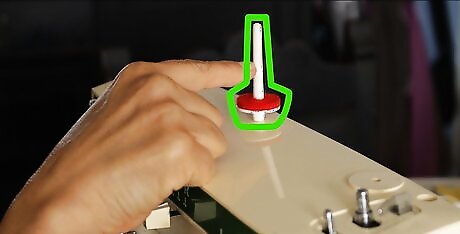
Locate the spool pin. This is a small plastic or metal pin that sticks out of the top of the sewing machine and holds your spool of thread. There may be an accompanying cap to hold the spool down while you use the machine.
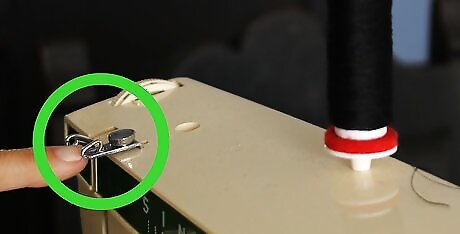
Look for the thread guide. The thread guide directs thread from the spool on the top of the machine to the bobbin winder (or on some machines, to the lower needle). It is a geometric metal piece that sticks out of the top of the sewing machine, typically on the left side. Check the user’s manual for your specific machine to be sure of its location and how to thread your machine.
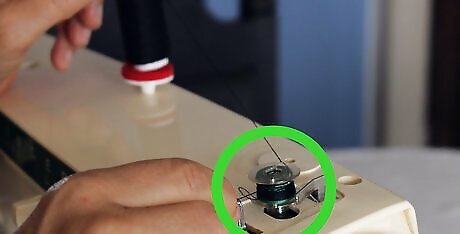
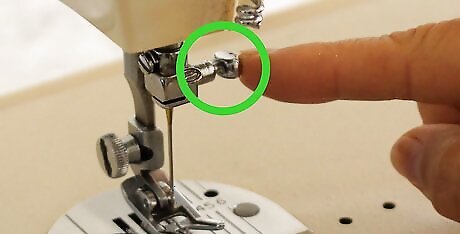
Find the bobbin winder. To the right of the spool pin on top of the sewing machine is another smaller plastic or metal pin, next to a small horizontal wheel. This is the bobbin winder and the bobbin winder stopper. These work together (with the spool of thread) to wind thread onto your bobbin prior to starting sewing. A bobbin is a smaller spool you must wind with thread and place underneath the needle before operating the machine (more on that below).
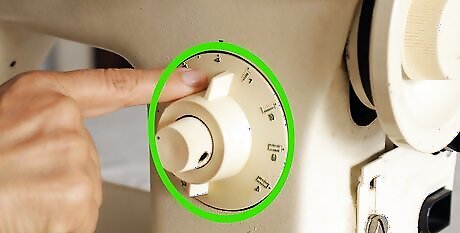
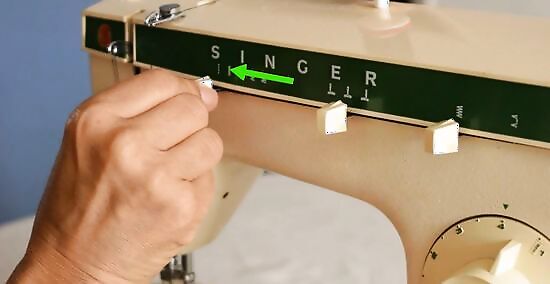
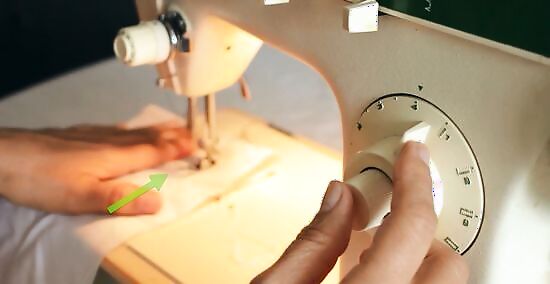
Look for the stitch adjustment buttons. These are in different locations depending on the specific sewing machine you have, but there are typically a few physical buttons (and sometimes a small screen, depending on your model) on the front or side of the sewing machine. These buttons select the type of stitch you create (a straight stitch or zig-zag, for example), the length of the stitch, and the direction of the stitch (forward or in reverse). Note the location of the reverse lever or button in particular. This reverses the direction of the stitching and you’ll need it to secure the beginnings and ends of your seams. Some models may have dials you turn to select different settings instead of pressable buttons. Check the manual for your specific machine to determine the functions and locations for each of the buttons.
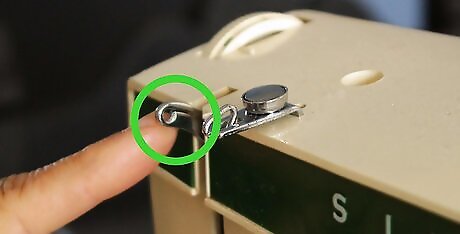
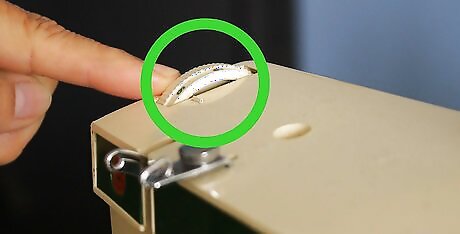
Locate the thread take-up lever and thread feed. This lever (with two cut-in grooves) is typically located on the front left side of the sewing machine and helps guide the thread. Beneath it is the thread feed (a series of channels and loops on the side of the machine beneath the take-up lever). There are typically numbers and arrows printed next to the feed to clearly show you how to thread the machine. The thread feed helps maintain even tension on the thread and avoid tangles while you use the machine.
Look for the tension dial. The tension dial is a small numbered wheel near the take-up lever. It controls the tension of the thread as you sew; if the tension is too tight, the needle will be pulled to the right. If the tension is too loose, the thread will loop on the bottom of the fabric you are sewing. The exact tension setting you need depends on the thickness or number of layers of fabric you’re working with. Check your user’s manual for recommendations for your machine.
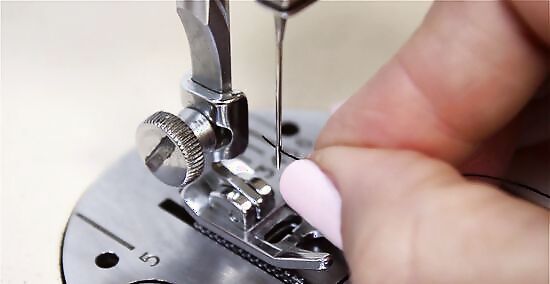
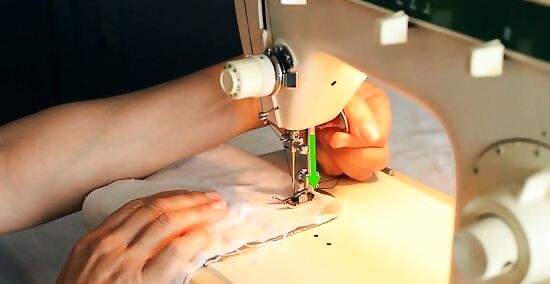
Find the needle clamp screw. This is a metal piece that holds the needle in place while sewing. It is located under the arm of the sewing machine, looks similar to a large nail, and sticks out to the right side of the needle. This is what holds the needle steady and makes sure it doesn’t move out of place while sewing.
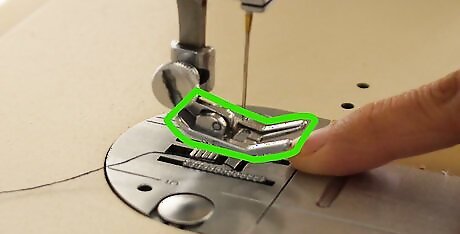
Look for the presser foot. This is a metal attachment under the needle clamp screw that looks like a small ski. When engaged, this holds the fabric in place and guides it through the sewing machine as you sew. There are different sizes and shapes of presser foots depending on the materials you’re sewing. For most projects, the basic or standard presser foot will do the job.
Find the presser foot lever that raises and lowers the presser foot. It will be a lever to the right or back of the needle assembly, near the presser foot. To adjust the presser foot, move it all the way down and all the way up. When sewing, you’ll raise the presser foot to adjust your fabric, then lower it to hold the fabric in place.
Look for the needle plate. The needle plate is the silver plate just below the needle that prevents your fabric from sliding down into the machine. Some needle plates also have measurement markings and lines on them to help you guide your fabric or determine seam width.
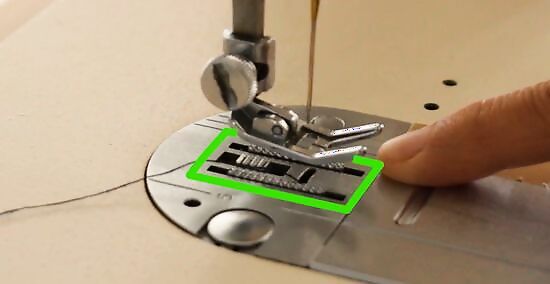
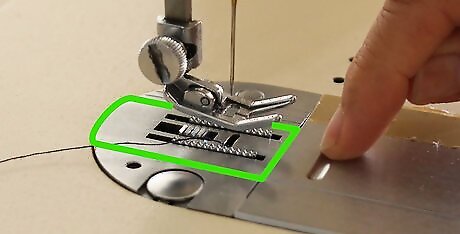
Find the feed dog. The feed dog is a small metal guide with “teeth” under the presser foot on the needle plate that moves the fabric through the machine as you sew. Find it by looking for the two small metal rows underneath the presser foot. You may occasionally have to adjust the feed dog depending on your project (for example, you’d lower them when sewing over buttons). For most projects, keep them up.
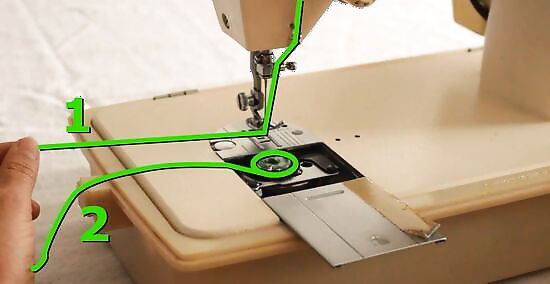
Locate the bobbin cover and bobbin release. The bobbin is a small spool of thread that is supplied from the bottom of the sewing machine, and supplies thread to the needle for the backing. The bobbin cover is a moveable cover near the metal plate where the needle is, and next to that there should be a cover release button or pin. You'll use this to put the bobbin in place before sewing.
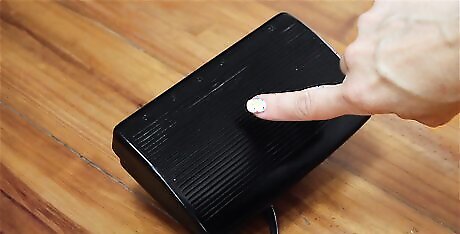
Locate the foot pedal. The foot pedal sits on the floor and is connected to your machine by a cord. On some models, the foot pedal cord is detachable; look for a port (likely near the power cord or its port) on the side or back of the machine to plug in the foot pedal. While sewing, you’ll press the foot pedal to make the needle move. Most pedals are pressure-sensitive; the harder you press, the faster the needle stitches.
Setting Up the Machine
Wait until the machine is set up and threaded to turn it on or plug it in. “Safety first!” says sewing expert Rhonda Hale, a Couture Fitting Tailor in New York City. “Before you start setting up, unplug your machine so you don’t accidentally switch it on while you’re threading it.” If the machine starts going too soon, you might end up snapping or tangling your thread (or worse, getting poked by a sharp needle).
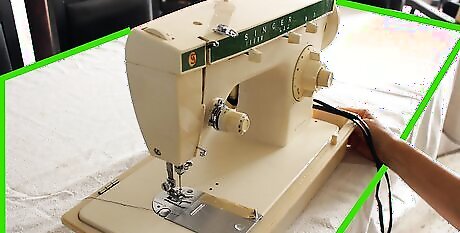
Place the machine on a sturdy table or desk in front of you. Sit in a chair that is a comfortable height for the height of the table, and arrange the machine so that the needle end is on your left and the body of the machine is on the right. Plug the foot pedal into the machine, too (if it is separate). Situate the pedal in a comfortable spot under your feet where you can comfortably press it both lightly and with some pressure.
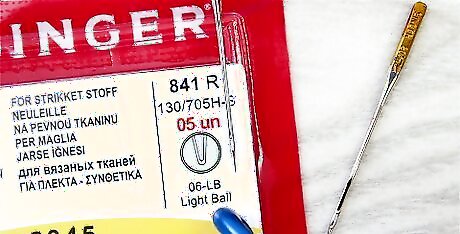
Choose a needle suitable for the fabric you’re working with. “All needles are labeled on the packaging for the specific kind of fabric they work best on,” explains Andrea Beaulieu, a professional tailor, fashion designer, and the owner of MOORE, a Brooklyn-based storefront and apparel workshop. “Knits need a tip needle, whereas wovens take a sharp tip. Needles are also sized based on the gauge of the needle. The smaller the gauge of the needle, the larger the number. [For example], 8-gauge needles are very thick and best for heavy-weight wovens, and a 16-gauge needle is very thin and great for delicate, lightweight fabrics.” Your machine may come with a variety of needles to choose from. Check your user’s manual for needle recommendations for different fabrics.
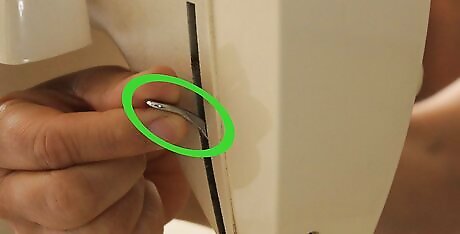
Install the needle securely with the needle clamp screw. Sewing machine needles have a flat side, meaning they can only fit one way into the clamp (usually with the flat side toward the back). Look for a groove down one side of the needle, generally opposite the flat side of the shank (the upper portion that goes into the clamp). This groove must face the direction from which the needle is threaded (the thread rides in this groove while going up and down through the fabric). Insert the needle all the way into the post and tighten the thumbscrew securely to install it. On some machines, you may need to tighten the screw with a screwdriver. You may need to use the hand wheel (a small dial that raises and lowers the needle manually) to adjust the height of the needle clamp screw to make the process easier. If you are having trouble fitting the needle, refer to your machine’s manual. Some machines will come with a needle already installed.
Threading & Placing the Bobbin
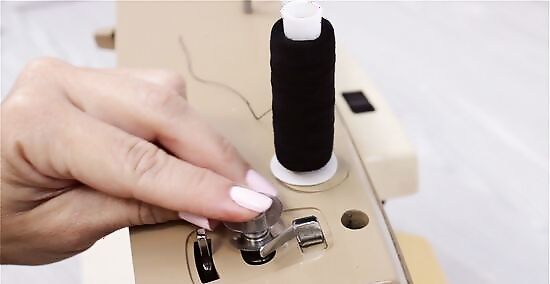
Place your thread on the spool pin and a bobbin on the bobbin winder. A sewing machine uses two thread sources: a top thread from the spool and a lower thread, stored on a bobbin. To begin winding the bobbin, place both the spool of thread and your bobbin on their respective pins. “The user manual is your best friend,” says professional tailor Andrea Beaulieu. “Make sure to read it through before starting and keep it handy to troubleshoot. Follow the guide for threading your machine and winding and loading the bobbin exactly, as any tiny deviation will cause problems. The tension and bobbin are the most challenging parts of the machine to master, so be patient with yourself and your machine.”
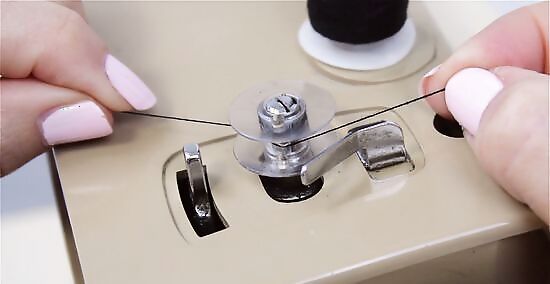
Feed spool thread through the thread guide and onto the bobbin. Loosen or unhook the end of the thread from your spool and feed it through the thread guide on top of your machine. Some machines may have a tension disk to wrap the thread around before reaching the bobbin (consult your manual). Then, wrap the thread around the bobbin a few times in a clockwise direction. Push the end of the thread into a tiny hole or slit in the side to securely attach it. It may be easier to remove the bobbin from the winder, thread it, then put it back on the winder.
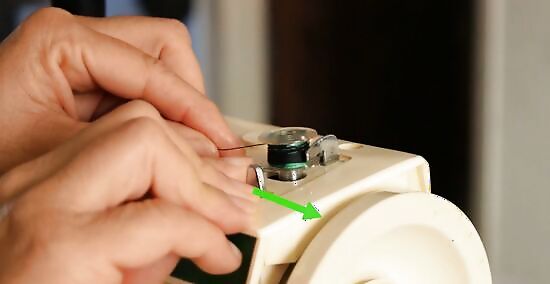
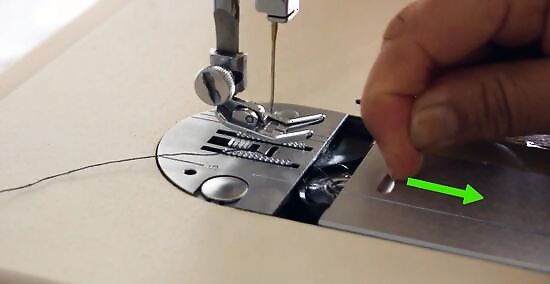
Slide the bobbin winder to the right and press the foot pedal to wind. Fully engage the bobbin winder by sliding it all the way until it’s securely in place. Then, simply press the foot pedal to fill the bobbin with thread. On most machines, the winder will stop automatically once the bobbin is full.
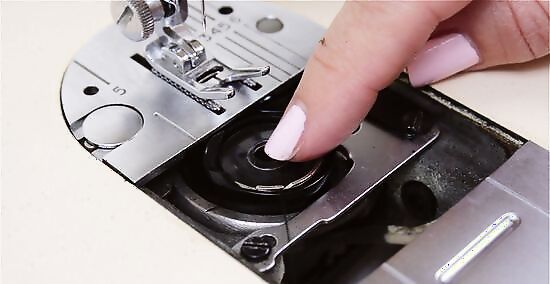
Place the bobbin under the bobbin cover with the thread exposed. Once the winding is done, slide the bobbin winder back to the left and snip the thread. Slide open the bobbin cover and drop your bobbin in place with the thread in a counterclockwise position (on most machines). Pull about 4 in (10 cm) of thread through the guide (a small notch) in the bobbin compartment and pull it to the left, leaving the thread outside (It will need to be brought up through the hole in the needle plate after you have threaded the top thread). Once you’re accustomed to your machine, “you can set up a bobbin for winding…as you are sewing other items,” explains Connie Tao, a bridal designer and the founder of Connie Tao Designs in Pasadena, California. “The bobbin winding mechanism will work while you use the machine.”
Threading the Machine & Needle
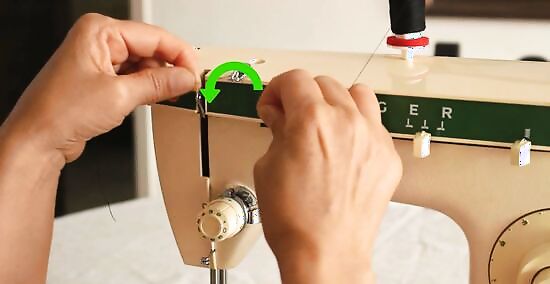
Feed the free end of the thread from your spool through the thread feed. To thread the machine, take the thread and pull it through the thread guide at the top, and then down and around the take-up lever and through the thread feed. There should be small numbers and arrows printed on the machine showing how to guide the thread through the channels and loops of the feed. Usually, the thread follows this general pattern: left, down, up, down, into a hook, through the needle. Another way to think is: spool pin, tension, take-up lever, needle (using the thread guides provided between these parts).
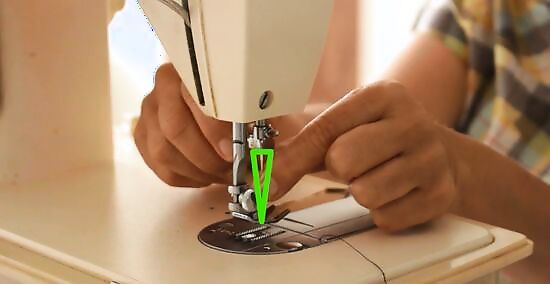
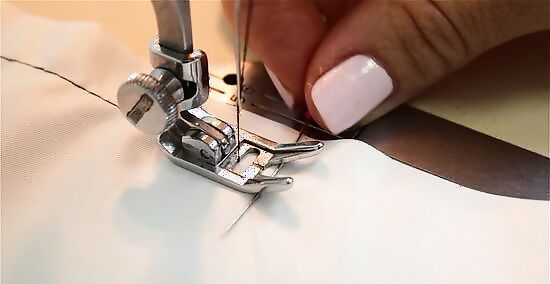
Run the thread through the eye of the needle. Once the thread is through the thread feed, pull it down from the end of the feed toward the needle to thread it. Most times, you’ll thread the eye of the needle from front to back (but check your user manual to be sure). Pull the thread through so there are several inches free on the other side. If you’re unsure from which direction to thread the needle, the last thread guide before the needle is located nearest to the direction from which you should thread it. Some machines have an automatic needle threader. Consult your user manual for instructions.
Connect the thread from the spool and bobbin to begin sewing. Hold the needle thread towards you in your left hand. With your right hand, make one complete needle down/up revolution by turning the hand wheel toward you. Then, pull up on the needle thread that you're still holding. The bobbin thread should have been caught when the threaded needle went down and up and is now looped over the needle thread. Pull on one side of the loop to bring up the bobbin thread tail, or just release the needle thread and pass a pair of scissors between the presser foot and plate to pull the looped bobbin thread out. You should now have the ends of two threads, one from the needle and one coming up from below from the bobbin. Slide the bobbin cover closed to secure it. Once you successfully catch the bobbin thread, you’re ready to make your first stitch!
Sewing a Basic Straight Stitch
Select a straight stitch and a medium stitch length. A standard medium stitch length is 2.5 to 3.5 mm (0.1 to 0.14 in), or about 10 to 12 stitches per inch. Consult your manual for how to do this on your machine with the stitch adjustment buttons or dials. Always set the stitch with the needle up and out of the fabric, since it may move the needle. A straight stitch is used to sew most seams. The next most common stitch is the zig-zag, usually used to prevent edges from fraying.
Line up your fabric under the needle to make your first practice stitch. Sew with the bulk of the material to the left of the machine; crowding the bulk on the right side can cause messy stitching. For your first stitch, practice on some woven scrap material before attempting to make or repair a garment. Avoid knits or heavy, thick fabrics like denim or flannel.
Lower the presser foot onto the fabric. Use the lever behind or to the side of the needle assembly that raises or lowers the presser foot to guide the presser foot down. If you give the fabric a gentle tug while the presser foot is down, you'll feel that the machine grips it pretty firmly. While you sew, the machine uses the feed dog underneath to advance the fabric at the correct speed. There's no need to pull the fabric through the machine; in fact, pulling can bend the needle or damage your project. You can adjust the speed and the stitch length on the machine.
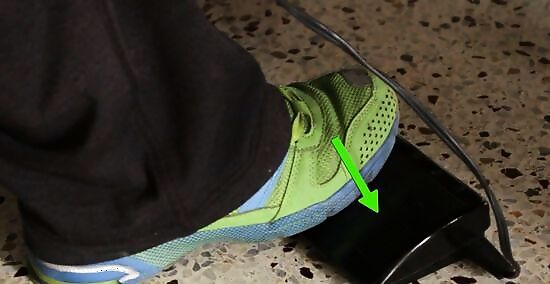
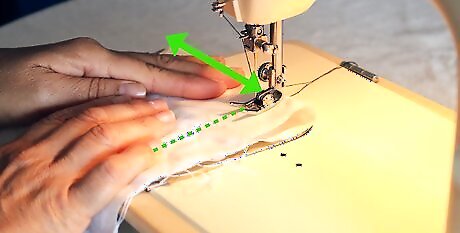
Press the foot pedal to begin stitching. The foot pedal is your speed control—the harder you push it, the faster you will go. Push it slowly at first (just enough to get the machine going). The machine will advance the fabric automatically away from you. Grip the loose ends of both threads for your first several stitches to keep them from retreating into the fabric. After you've stitched for a short distance, let go and use both hands to control the fabric and the machine. Professional tailor and designer Andrea Beaulieu says, “if your thread is knotting or too loose on the bottom of your fabric, adjust the upper tension [on the thread]. If it’s knotting on the top, adjust the bobbin.” “Steer” the fabric in a straight line or a curve by guiding it through the machine with your hands. Try sewing in a straight line and making some curves to get a feel for both. Don’t force or pull the material while it’s going under the needle. This can cause the material to stretch or the needle to break, or the stitches to clog up in the bobbin. If you feel like the fabric is not moving fast enough, press the foot pedal harder, adjust the stitch length, or (if you must) buy a faster machine.
Engage the reverse button or lever at the end of the fabric to backstitch. This lever reverses the direction that the machine feeds, so the fabric travels toward you as the machine sews (on some machines, this button or lever is spring-loaded, so hold it down to sew in reverse). At the end of a seam or the edge of the fabric, sew a few stitches in reverse back over the last few stitches you just made to keep the thread from pulling out. It’s OK if your stitch or seam runs off the fabric. You can still engage the reverse lever and backstitch back onto the fabric. According to professional designer Andrea Beaulieu, “You should always backstitch before ending…to secure what you have just sewn.”
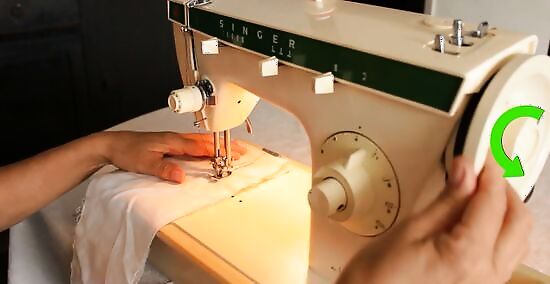
Move the needle up with the hand wheel and snip the thread to finish. Guide the needle up to its highest position, then raise the presser foot to free the fabric (it should pull out easily). “Trim the thread close to the fabric, not the needle,” explains professional tailor Andrea Beaulieu. “This will ensure you don’t have extra trimming work to do later, and also keeps your machine set up for the next bit of stitching without pulling the thread out of the needle (which is what happens if it’s cut too close).” If the thread pulls back when you try to remove the fabric, check the needle position. On many machines, there is a small notch on the back of the post that holds the presser foot you can use to sever the thread. Otherwise, use sewing scissors to trim the thread.
Sewing Basic Seams & Corners
Pin two pieces of fabric, right sides together, near their edge. Place the pins perpendicular to the line where the seam will go (most seams are typically ½ inch (1.3 cm) to ⅝ inch (1.6 cm) from the edge of the fabric). Be sure to pin the right sides of the fabric together so that the seam allowance will end up on the inside. The “right” side is whichever side of the fabric you want on the outside when the piece is done (on printed fabric, it’s generally the side with brighter colors. Solids may not have an obvious right side). While you're looking at the fabric, notice which way the fabric goes. Seams may go any direction, but most sewing projects are cut so the main seams go parallel with the lines of the weave. Also note the direction of the print, if your fabric has one, and arrange it so it will be "right side up" (such as with a floral or animal print) or so that stripes or other patterns run a certain direction. While you might sew a single layer of fabric to stop an edge from fraying, the goal of most machine sewing is to join two pieces of fabric. So, get plenty of practice sewing with a couple of layers and pins!
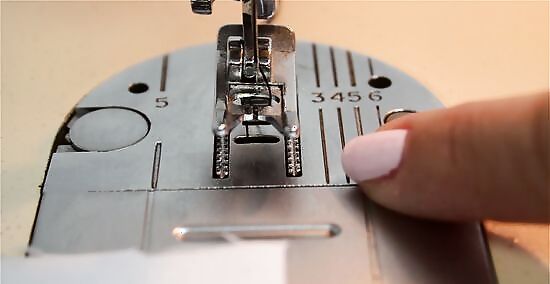
Align the edge of the fabric with a seam allowance line on the needle plate. Seam allowance is the space between the edge of the fabric and the stitching line. Look for lines on your sewing machine indicating seam allowance—generally, use the line at ⅝ inch (1.6 cm) or ½ inch (1.3 cm). If your needle plate has no markings, use chalk, a marker, or masking tape to mark your desired seam allowance.
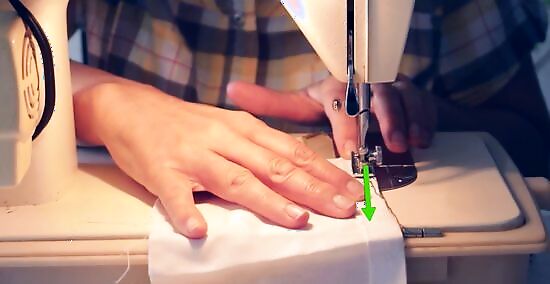
Sew a straight stitch to make the seam, removing pins as you go. As a pin approaches the needle, slow down or stop the needle and pull the pin away. Some tailors advise sewing right over the pins and removing them later, but this can break or dull the needle if it accidentally strikes a pin directly. Never sew over the thick head of a pin. When you’ve completed your seam, remember to backstitch over the last several stitches to secure the thread. To move to another part of the fabric, take your foot off the pedal and raise the needle all the way. Reposition the fabric, then begin stitching again in the new spot.
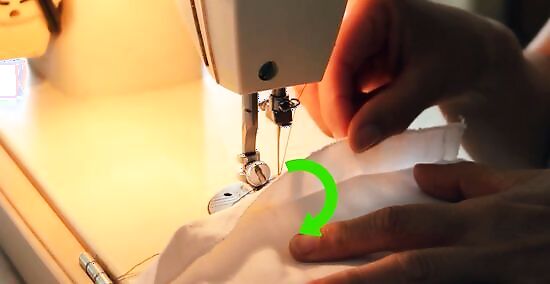
To create a corner, pause the needle while it’s down and rotate the fabric. Where you want to turn the corner, lower the needle all the way into the fabric with the hand wheel. Raise the presser foot, leaving the needle down in the fabric, and rotate the fabric to the new position. Lower the presser foot with the fabric in the new position and resume sewing to marvel at your crisp, sharp corner.


Comments
0 comment