
Using the Sun's Position
Locate a clear view of the sun with few obstructions. Areas with tons of trees or buildings can obscure your view of the horizon. Without being able to see the horizon, you cannot get an accurate measurement. If you can find a field with no tall objects nearby, you will get a more accurate reading. This technique will tell you approximately how much daylight is remaining. Use this method on sunny days, with minimal or no clouds in the sky. If you cannot see the sun at all, you cannot track its position. Being aware of the approximate time of day might be helpful if you’re trying to estimate the time.
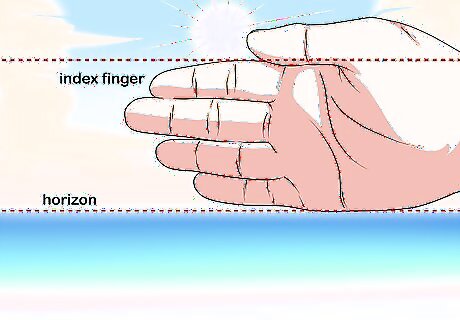
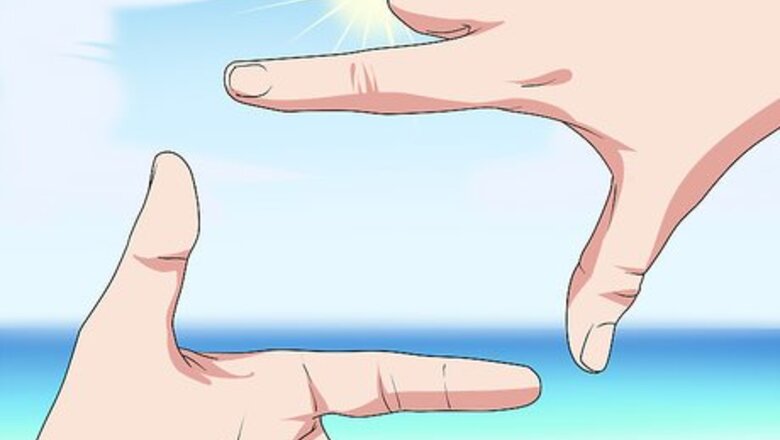
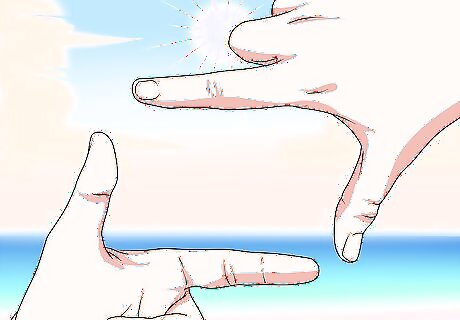
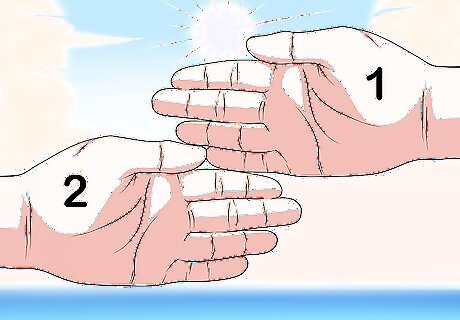
Line up your hand with the horizon. Hold up your arm with your wrist bent so that your hand is horizontal and your palm is facing towards you. Line up the top edge of your index finger with the bottom of the sun. Your bottom (pinky) finger should be between the ground and sky, but if your bottom finger is below the horizon, then the sun will set within the next hour. Hold your hand in this position. Either hand can work, but you may feel most comfortable starting with your dominant hand. Keep your thumb out of the way. Because thumbs are thicker and angled away from your fingers, they will ruin your timing.Warning: Do not look directly at the sun as this can cause serious eye damage! Look just below the sun as you position your first hand.
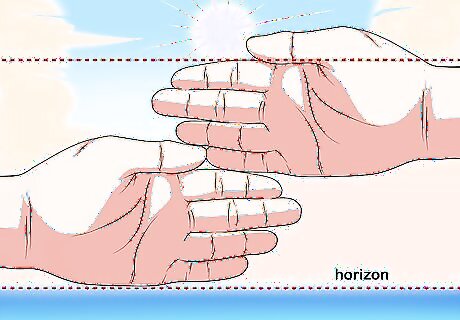
Stack one hand below the other towards the horizon. If you still have space between your hand and the sun, stack your other hand under the first one. Press the index finger of your other hand against the pinky finger on your first hand. Continue stacking one hand under the other until you reach the horizon.
Count the number of hands it takes to get to the horizon. Keep track of how many hands it takes to go from the bottom of the sun to the horizon. The number of hands it takes is the number of daylight hours remaining, or the hours left until sunset. For example, if you count 5 hands, then there are 5 hours remaining in the day or 5 hours until sunset.
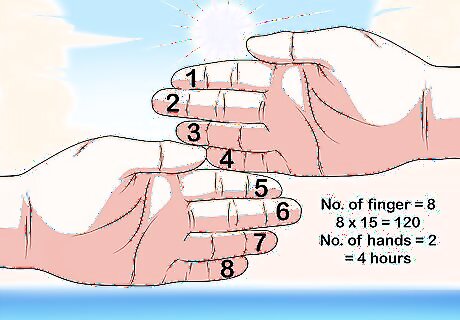
Total your finger counts for a more accurate estimate. Once you've reached the horizon, you can also count how many fingers could fit in the space between the sun and horizon if you can’t fit a whole hand there. This is also helpful if you cannot fit your whole hand between the sin and the horizon. In this case, you will only need to count the fingers between the sun and horizon instead. Each finger that will fit in this space represents 15 extra minutes before sunset. Multiply the number of fingers by 15 and add this to the number of hands you counted. For example, if you counted 4 hands and 2 fingers, then you have approximately 4.5 hours left until sunset. Keep in mind that this will still only give you a rough estimate of the remaining time in a day.
Making a Sundial
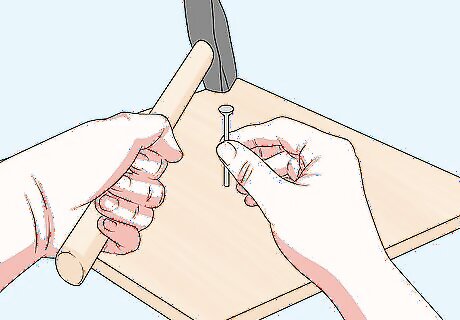
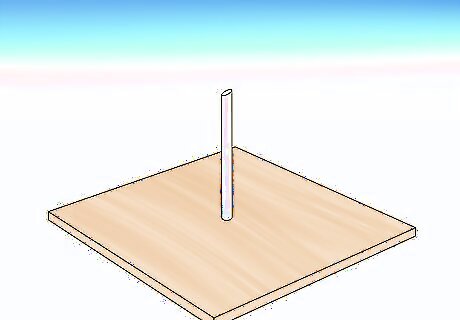
Hammer a 3 in (7.6 cm) nail 0.25 in (0.64 cm) into a 12 by 12 in (30 by 30 cm) board. You can estimate the location of the center, or measure 6 in (15 cm) in from the edges of the board to find it. Press the tip of the nail into the center point, and hit the head of the nail with a hammer just enough to drive it into the wood by 0.25 in (0.64 cm). Using a wooden board is ideal because it will hold up better against the elements and stay put even if it gets windy. Avoid using paper, foam, or other flimsy materials to make a sundial.
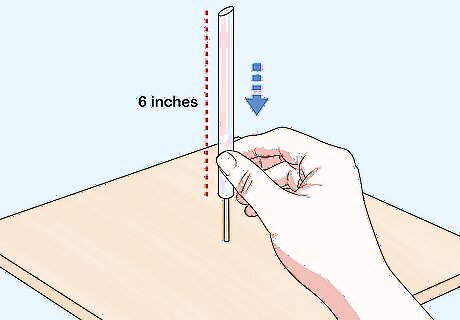
Cut a plastic straw 6 in (15 cm) long and slip it over the nail. Measure the straw with a ruler or measuring tape, and then cut it with sharp scissors. Slide the straw onto the nail so that 1 end of the straw is pressing against the wood. Make sure that the straw you use is big enough to fit over the head of the nail.
Place the board on a bright, level space at the start of a morning hour. Take the board outside as close to sunrise as possible. Find a nice, flat spot on the ground where the sunlight will not be obstructed by trees, buildings, or other things. Keep in mind that the shadows will change throughout the day, so be sure that the board will not be obstructed by a shadow at any time of the day. For example, you could place the sundial on a flat patch of lawn in your backyard. Tip: If you’re using a lightweight piece of wood, or if the conditions are windy, place a rock or brick on each corner of the square to weigh it down and prevent it from blowing away.
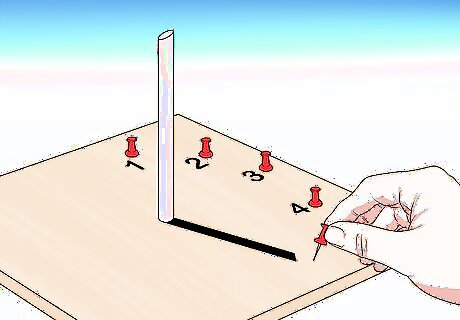
Mark the straw’s shadow and the hour on the board. Push a thumb tack into the location on the board where the straw’s shadow ends. Then, write the hour next to this thumb tack. Use a permanent marker or pen to write the hour. Repeat this for every hour of the day. For example, if it is 7:00 am, then write this next to the thumb tack. Then, come back an hour later, and mark the location of 8:00 am on the board. Continue until the sun sets and there is no longer a shadow to track. Keep in mind that the straw’s shadow will only be visible around half of the board and the length of the shadows will vary as the day goes on.
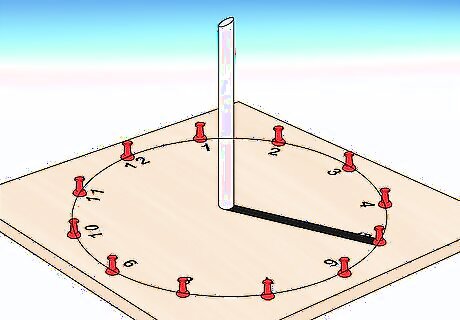
Leave your sundial in the same location and visit it to check the time. Now that you have marked the sundial for each hour of the day, you can use it to tell time while you are outside. Keep in mind that this will only work during the day and it works best when there are no or few clouds. Also, be aware that the sundial will gradually become less accurate since the amount of daylight changes over time. Plan to make a new sundial about once every 3 months. Don’t move the sundial! It needs to stay in the same location to be accurate.
Tracking the North Star
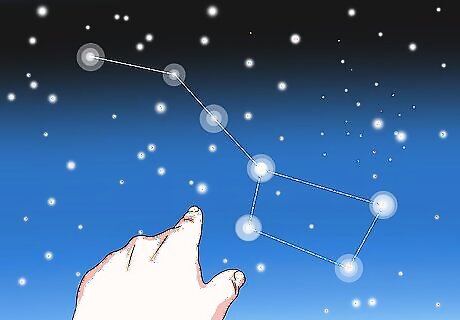
Locate the Big Dipper. At night, go to a location free from bright lights or significant pollution. Using a compass, find north and stand facing it. The position of the Big Dipper may change depending on your geographic location but will be in the northern area. The Big Dipper is comprised of 7 stars shaped like a bowl with a handle. The 4 stars making up the bowl are shaped like a rhombus, with the 3 stars making the handle organized in a line to its left or right depending on the hemisphere you are in. The Big Dipper will be easier (or harder) to spot during some seasons, depending on your location. For example, it might be harder to spot the Big Dipper in the winter if you are in the Northern Hemisphere.
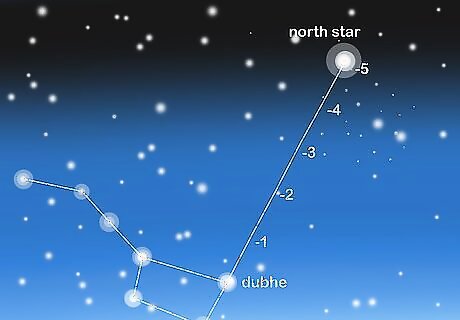
Use the Big Dipper to find the North Star. Spot the 2 stars making up the line opposite the handle of the Big Dipper's bowl (Dubhe and Merak). Trace an imaginary line from that point upward, about 5 times as large as the line between Dubhe and Merak. When you reach a bright star in this approximate location, you have reached the North Star.
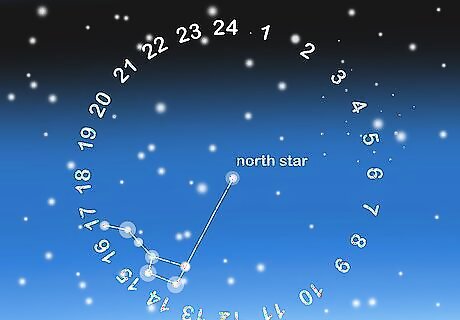
Picture the North Star as the center of a large clock in the sky. Divide the sky into 24 sections around the North Star, as evenly as you can estimate. The North Star (or Polaris) can function as the center of a 24 hour clock in the sky. Keep in mind that an analog clock moves 30 degrees per hour, but a Polaris-focused clock will only move 15 degrees per hour and in the opposite direction of an analog clock.
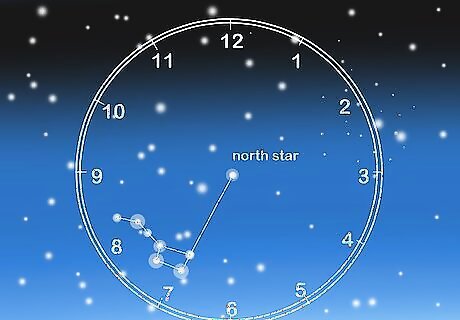
Use the Big Dipper to calculate the raw time. After sectioning the sky, estimate the time by using the Big Dipper as an imaginary hour hand. When the Big Dipper's star opposite the handle (Dubhe) passes through your section, this is the raw time. However, keep in mind that this will only give you a rough estimate. For example, if the hand is pointing straight up from the North Star, then the raw time is midnight. Tip: Remember that the hours on the clock are reversed since the hand moves in a counterclockwise direction. For example, if the hand is pointing straight out to the left, then the time is 3:00 am.
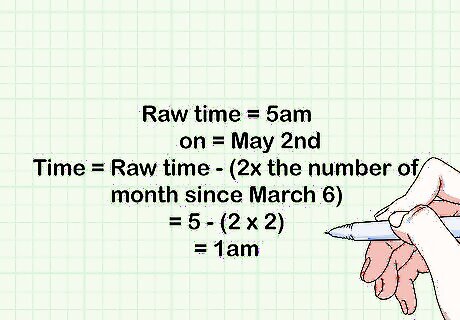
Calculate the actual time using a special equation. If you need a more accurate time reading, then you can perform a calculation to find it. The calculation you need to use is: (Time = Raw Time – [2 X the number of months since March 6]). If the date is March 6 exactly, you will need to make no calculations. During any other day of the year, however, this calculation is vital to get a more precise calculation. For example, if the Raw Time is 5 AM on May 2nd, you would use the equation Time = 5 - (2 X 2) to get 1 AM. This equation is not exact. The actual time may be anywhere within a half hour of your calculated time.
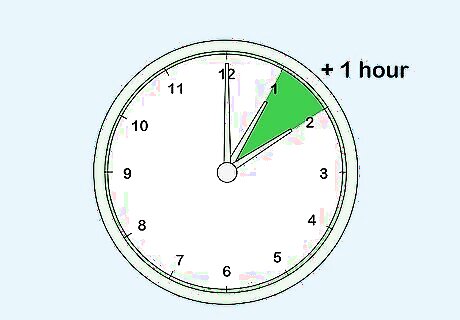
Account for daylight savings time by adding 1 hour to the time. If daylight savings time is currently in effect in your time zone, add 1 hour to the time. Only do this during the months when Daylight Savings Time (DST) is in effect. For example, if the time you calculated was 1:00 am, then adding 1 hour would make it 2:00 am.
Telling Time by Moon Phases

Use the moon to tell time only when it is at its brightest. Monitoring moon phases is not as accurate of a way to keep time as making a sundial or measuring by the North Star. Based on the current lunar phase, the moon will only be visible in the night sky for a certain amount of time and it will be easiest to see when it is full or almost full. For example, during a full moon, the moon will be visible in the sky all night (for approximately 12 hours). The moon will be harder to spot throughout the night when it is not full. Tip: On the day of the new moon, you will not be able to spot it in the night sky at all and you’ll need to use a different option to tell time.

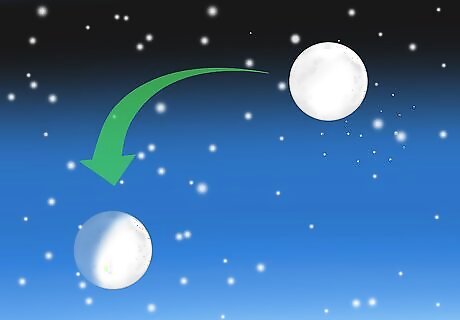
Find out what time the sun set. Knowing when the sun set will give you a baseline time to start tracking the time with the moon since the moon rises about 1 hour after the sun sets. If you can, look up the time that the sun set before you observe the moon’s position and add 1 hour to this time to create a baseline time. For example, if the sun set at 6:30 pm, and the moon is just now visible on the horizon, then it is approximately 7:30 pm.
Track the position of the moon to determine the approximate time. You can use the moon to tell time by dividing the sky into quarters and noting the moon’s position in the sky. Find the middle of the sky, and then divide these 2 halves in half to divide the sky into quarters going from east to west. This won’t give you an accurate time, but you can get a good estimate. Look at the moon's position in the sky in relation to where it rose. For example, if the moon is ¼ of the way across the sky from where it rose, then it is about 3 hours past sundown. If the moon is halfway across the sky, then it is approximately 6 hours past sundown. If the moon is ¾ of the way across the sky, then it is 9 hours past sundown.
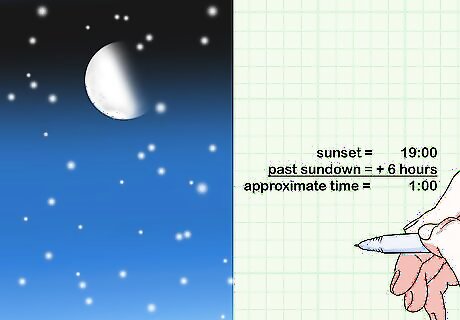
Use the moon’s position to calculate the approximate time. The location of the moon in the sky along with the time the sun set, will allow you to calculate an approximate time. Once you have noted these details, add the number of hours for the position of the moon to the time of sunset. For example, if the sun set at 7:00 pm, and the moon is halfway across the sky, then the approximate time is 1:00 am. If the sun set at 6:15 pm, and the moon is ¾ of the way across the sky, then the approximate time is 3:15 am.


Comments
0 comment