
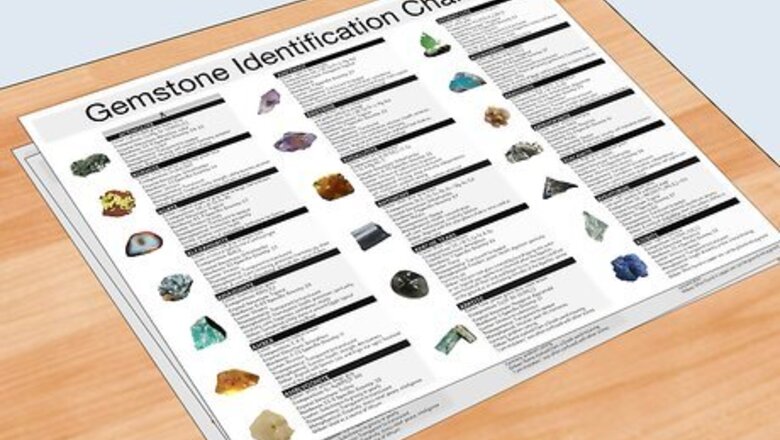
Using Identification Charts

Invest in a gemstone identification chart. If you think you'll be identifying gemstones often, it would be in your best interest to invest in a printed chart or reference manual. When in doubt, look for a book or chart endorsed by the Gemological Institute of America (GIA) or the American Gemological Association.
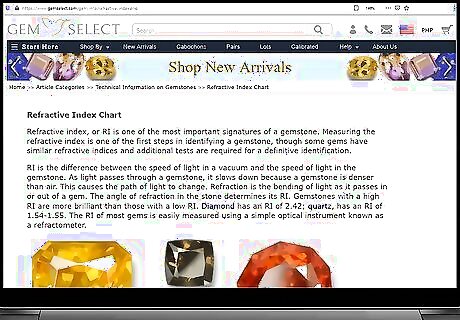
Look online for basic charts. If you only need to identify a gemstone on rare occasions, you might be able to manage the task by looking at individual gemstone identification charts online. These charts are much less detailed and less extensive, but they might work in a pinch. The Hiddenite Gems' gemstone identification chart can be used when you know color and hardness. The Gem Select RI chart can be used when you know refractive index and birefringence: https://www.gemselect.com/gem-info/refractive-index.php The American Federation of Mineralogical Societies (AFMS) offers a free Mohs' Scale chart: https://www.amfed.org/t_mohs.htm
Verifying that the Stone is a Gemstone

Feel the stone's surface. A stone with a rough or sandy texture should not be identified as a gemstone.
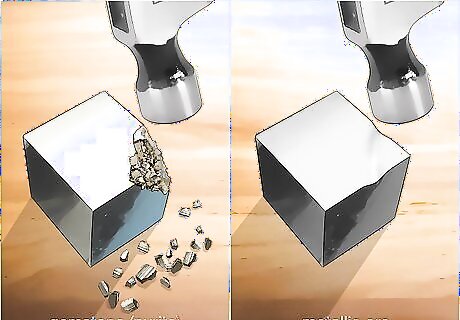
Check its malleability. A stone that is readily malleable—i.e. easy to shape by hammering, crushing, or bending it—the stone is more likely a metallic ore than an actual gemstone. True gemstones have a crystalline structure. This structure can be shaped through cutting, fracturing, and abrasion, but it has fixed planes that cannot be altered by pressure alone. Don't hit a stone with a hammer if you don't want to shatter it. Real gemstones don't get bent or reshaped, but they do break.

Know which materials are not classified as gemstones. In particular, pearls and fossilized wood can be mistakenly classified as gemstones but do not fit the qualifications in the strictest sense of the term.
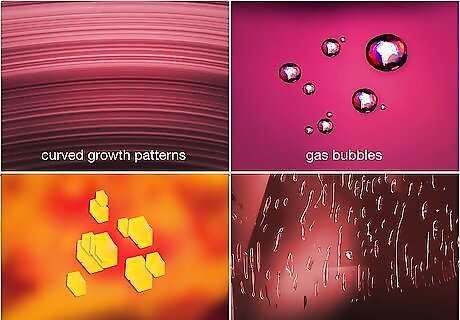
Watch out for synthetics. Synthetic stones share the same structure, chemical composition, and physical properties of their natural counterparts, but they are created in a lab rather than made naturally. You can usually spot a synthetic by observing several characteristics. Synthetic stones often have curved growth patterns inside the stone rather than angular growth patterns. Gas bubbles that are round and come in large strings are often an indication, but be careful, since a gas bubble in an inclusion can occur within natural stones. Platinum or gold platelets can stick to synthetic stones. Fingerprint-patterned inclusions are common in synthetics, as are nail-shaped inclusions, chevron (v-shaped) growth patterns, wispy veil-like inclusions, and interior columnar structures.
Watch out for imitations. An imitation stone is a material that looks like a real gemstone at first glance in spite of the fact that it is made of a completely different material. These stones can be natural or artificial, but there are a few good techniques used to spot them either way. Pay special attention while checking Turquoise, Lapis, Sapphire, Ruby, and Emerald because there are many treatments available in the market that make the stones seem like natural. The surface of an imitation may look pitted and uneven, like an orange peel. Some imitations have swirl marks known as "flow lines." Large, round gas bubbles are common within imitations. Imitations tend to feel lighter than their natural counterparts.
Determine whether or not the gemstone is an assembled stone. Assembled stones are made of two or more materials. These stones may consist entirely of natural gems, but oftentimes, synthetic materials are mixed in. Use a penlight to illuminate the stone when checking for signs of assembly. Look for differences in luster or for colored and colorless cement. Also look for the "red ring effect." Turn the stone face down and look for a red ring along the outer part of the stone. If you spot the red ring, you probably have an assembled stone.
Making Basic Observations

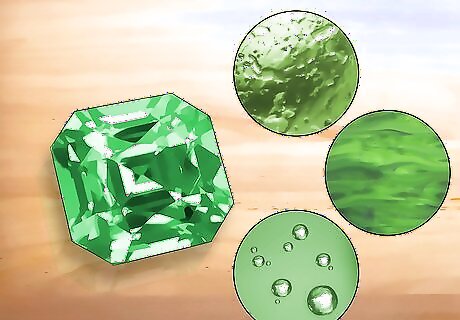
Look at the color. The color of the gemstone is often your first clue. This component can be further divided into three parts: hue, tone, and saturation. Do not shine a light into the stone to examine its color unless you have a dark stone and need to determine whether it is black, dark blue, or another deep color. "Hue" refers to the stone's overall body color. Be as specific as possible. For instance, if a stone is a yellowish green, identify it as such instead of merely saying "red." The GIA separates stone hue into 31 different colors. "Tone" refers to whether a color is dark, medium, light, or somewhere in between. "Saturation" refers to the intensity of color. Determine whether the hue is warm (yellow, orange, red) or cool (purple, blue, green). With warm colors, check the stone for brown tints. For cool colors, check the stone for gray tints. The more brown or gray you see, the less saturated the stone color is.
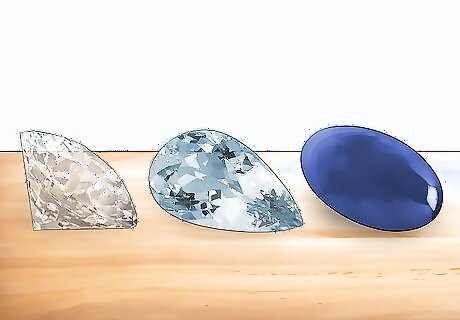
Observe the transparency. Transparency describes how light filters through the gemstone. A stone can be transparent, translucent, or opaque. Transparent stones are completely see-through (example: diamonds). Translucent stones can be seen through, but some color or haze alters the image (example: amethyst or aquamarine). Opaque stones cannot be seen through (example: opal).

Check its heft or estimated specific gravity. You can determine heft—how heavy the gemstone is—by simply bouncing it in your hand. This is a quick and easy way to estimate a stone's weight without performing complex specific gravity tests and equations. To judge heft, bounce the stone in the palm of your hand and ask yourself if it feels as heavy as you would expect for its size or if it feels heavier or unusually light. Specific gravity readings are fairly outdated as a practice among gemologists, and heft measurements are used as a relatively accurate estimation. For example, aquamarine has low heft while blue topaz, which is similar in appearance, has a high or heavy heft. Similarly, diamond has a lower heft than synthetic cubic zirconia.
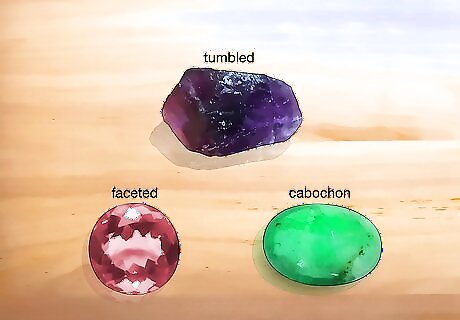
Note the cut. While not a foolproof method of identification, some gemstones are more likely to be cut in certain ways. Oftentimes, ideal cuts are determined by the way light bounces off the crystalline structure of the stone. The most common cut styles you will run across include faceted, cabochon, cameo, bead, and tumbled. Within each of these basic cut styles, you will usually see sub-styles, as well.
Studying the Gemstone in Detail
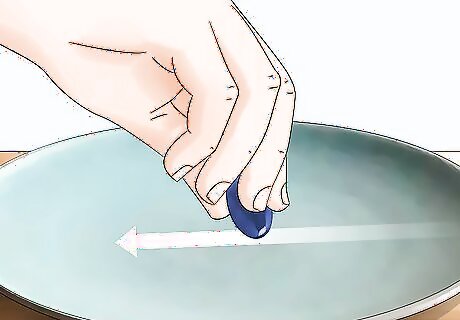
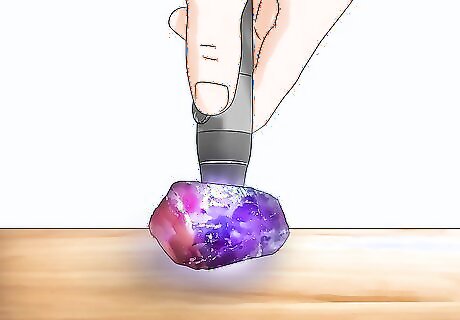
Ask yourself if damage tests are appropriate. There are a few identification tests that you may wish to avoid if you need to preserve the gemstone in its current state. This includes hardness, streak, and cleavage tests. Some stones are physically harder than others, and hardness is usually measured by the Mohs' Scale. Use the various substances provided in a hardness kit to scratch the surface of the gemstone. If the stone can be scratched, it is softer than the substance you scratched it with. If the stone cannot be scratched, it is harder than the substance. To test streak, drag the stone across a ceramic plate. Compare the streak left behind to the streaks illustrated on a streak chart. "Cleavage" refers to the way a crystal breaks. If there are chips along to surface, examine the area inside the chips. If not, you will need to strike the gemstone hard enough to break it. Ask yourself if the area is rounded like rings on a seashell (conchoidal), straight like steps, granular, splintery, or uneven.
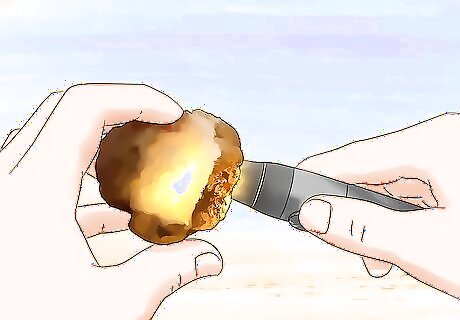
Check optical phenomena. Optical phenomenon only occurs inside certain stones. Depending on the stone, you might observe color change, asterism, bands of moving light, or more. Check for optical phenomena by passing a pen light across the stone's surface. Color change is one of the most important optical phenomena to look for, and every stone should be checked for color change. Look for changes in color between natural light, incandescent light, and fluorescent light.
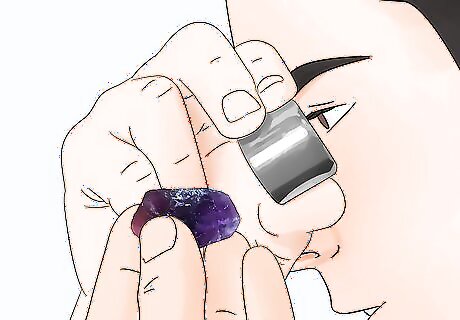
Look at the luster. Luster refers to the quality and intensity with which a surface reflects light. When testing for luster, reflect light off the portion of the gemstone with the best polish. To check for luster, turn the stone, allowing light to reflect off its surface. View the stone with the naked eye and with a 10x loupe. Determine if the stone looks dull, waxy, metallic, shiny (adamantine), glass-like (vitreous), greasy, or silky.

Observe the gemstone's dispersion. The manner in which a stone separates white light into its spectral colors is called dispersion, and the visible display of dispersion is called fire. Examine the amount and strength of this "fire" to help identify the stone. Shine a penlight through the stone and examine the fire inside the stone. Ask yourself if the fire is weak, moderate, strong, or extreme.

Determine the refractive index. You can test refractive index (RI) using a refractometer. Using this device, you'll be able to measure the degree at which the course of light is altered within the stone. Each gemstone has its own RI, so discovering a sample's RI can help you figure out what sort of stone it actually is. Place a small bead of RI fluid on the metal surface of the refractometer near the back of the crystal hemicylinder (the window on which the stone will sit). Place the stone facet face down on the fluid dot and slide it toward the middle of the hemicylinder crystal using your fingers. Look through the viewer lens without magnification. Continue looking until you see the outline of a bubble, then look at the bottom of this bubble. Take the reading from there, rounding the decimal to the nearest hundredth. Use the magnifying lens to take a more specific reading and round it to the nearest thousandth.

Consider testing the birefringence, as well. Birefringence is related to RI. While doing birefringence test, you will turn the gemstone on the refractometer six times throughout the observation period and note the changes. Perform a standard RI test. Instead of keeping the stone still, gradually turn it 180 degrees, making each separate turn about 30 degrees. At each 30 degree mark, take a new RI reading. Subtract the lowest reading from the highest to find the stone's birefringence. Round it to the nearest thousandth.
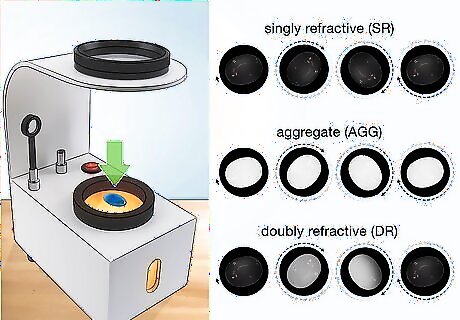
Check for single or double refraction. Use this test on translucent and transparent stones. You can determine whether the stone is only singly refractive (SR) or doubly refractive (DR) to help identify it. Some stones can also be classified as aggregate (AGG). Turn on the light of a polariscope and place the stone face down on the lower glass lens (polarizer). Look through the top lens (analyzer), turning the top lens until the area around the stone looks darkest. This is your starting point. Turn the analyzer 360 degrees and watch how the light around the stone changes. If the stone appeared dark and stays dark, it is likely an SR. If the stone starts light and stays light, it is likely AGG. If the lightness or darkness of the stone changes, it is likely DR.


Comments
0 comment