
Sorting & Stain Treatment
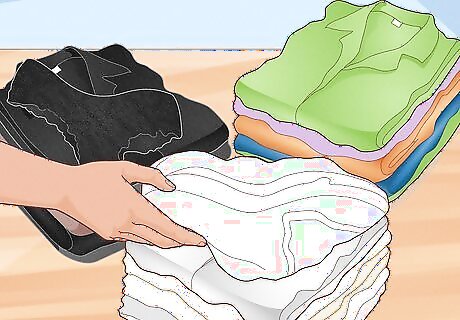
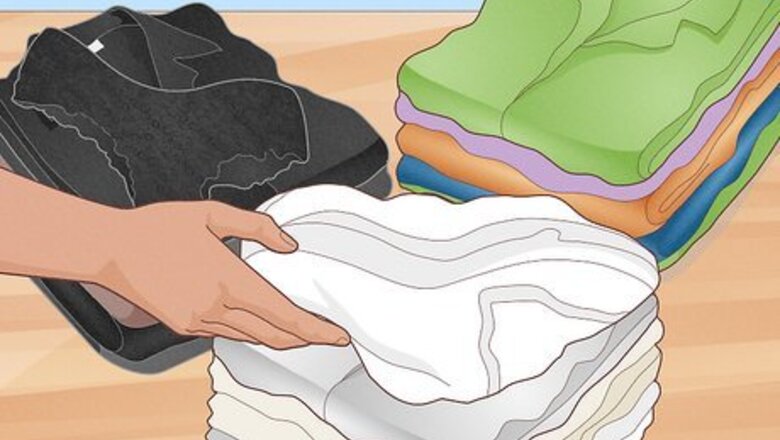
Create separate piles to sort your laundry. Check all of the pockets as you separate things and zip any zippers to keep lint out. Set aside any items that have unique fabrics or seem especially sensitive. Read the care instructions on those tags and create separate piles for unique garments. In general, you’ll want separate piles for: Whites — Any all-white T-shirts, white socks, white underwear, etc. Lights — This includes white shirts with patterns, white underwear with any images, white socks with stripes or logos, and anything tan or off-white. Brights — Anything teal, bright red, purple, or especially vibrant. You can throw jeans in this pile if they aren’t black or tan. Darks — All of your black clothes. Include anything navy, brown, dark purple, or maroon.

Pre-treat any stains (optional). If you have any stains you want to get rid of, use a stain removal product before laundering it (any enzyme cleaner) will work. Follow the instructions on the product to treat the stains. Once a stain has been dried in a dryer, it’s extremely difficult to remove. This is why you want to treat stains before you wash the clothing.
Running a Cycle
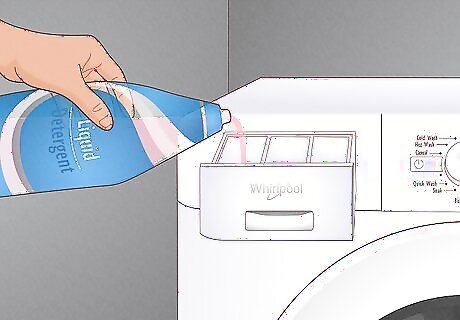
Put detergent in the dispenser. On most Whirlpool machines, the dispenser is either built into the machine below the lid, or tucked in a drawer near the hinge of the door. Open the dispenser and locate the fill line. Add enough detergent to reach just below that fill line. Adding more detergent does not make your clothes cleaner. In fact, the opposite happens. Excess soap gets clogged in the fabric, making it harder for water to flow through the clothes. If you have separate compartments for them, you can add fabric softener, fabric brightener, or color cleaner if you’d like. However, just be aware that these products are generally bad for the health of your clothes in the long run.

Press the power button to turn the machine on. Whirlpool machines automatically shut off if left on for too long to preserve energy. Press the power button, and you should hear a chime pop on as the lights illuminate on the dashboard.
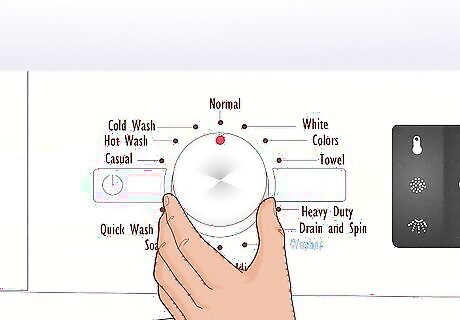
Turn the dial to set the type of wash cycle you want to run. If you only have one dial on your dashboard, press the “program” or “P” button first. This lets the machine know you want to choose a cycle. If you have multiple dials (as it is with most models), the wash cycle is set on the biggest dial (usually in the middle). Here’s an overview of the Whirlpool cycles (your machine might not have all of these): Normal — This is for general fabrics. Cottons, linens, and mixed garments are all fine for this load. Cold Wash — This is the same as the normal cycle but with tap cold water. This is ideal if you want to minimize shrinking. Colors/Whites/Towels/Jeans — These cycles only appear on certain models. They are designed for what they sound like they’re for. Casual — The casual load is shorter and uses less agitation. It’s ideal if you’re just washing pajamas or something that didn’t really get dirty. Quick Wash — This is specifically for small loads when you’re in a rush. Soak — The soak cycle is actually not just going to soak the clothes. It soaks the clothes then runs a normal cycle. It’s a solid option if you have very filthy clothes but don’t want to add agitation. Bulky/Bedding — This is for jackets, sheets, and comforters. This cycle uses more water and fills completely before agitating anything. Heavy Duty or Deep Water Wash — This is for extremely dirty clothing, like oil stains, caked-on mud, or excessive dirt. Drain and Spin — This is an extra cycle you can run if you want to air dry clothes when you’re done. The drum will spin with no water in it to squeeze out excess moisture. Clean Washer — Whirlpool explicitly says to do this after every 30 loads. Set an Affresh cleaner tablet or chlorine bleach in the drum and run this cycle to clean the machine.
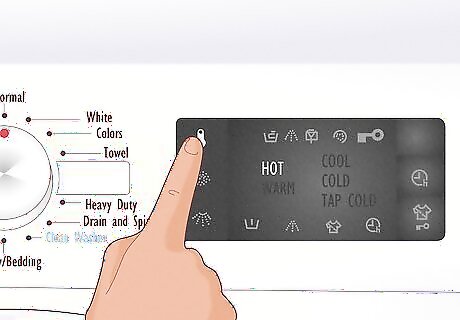
Select the temperature setting for the water. Depending on your specific wash setting and your Whirlpool model, you may not be able to do this. If you can set the temperature, choose whichever option seems most appropriate for your load. On Whirlpool machines, these are your options: Hot — Ideal for extremely dirty clothing when you aren’t worried about shrinking. You shouldn’t need to use this setting very often. Hot water will also wash out colors over time, just FYI. Warm — Warm water is ideal for sheets, towels, and undergarments. Anything that gets exposed to a lot of sweat or body fluid. Cool — If you want a good middle ground between efficient cleaning and minimal wear and tear on your clothes, the cool setting is ideal. Cold — Another good middle-ground option if you don’t want to put any pressure on your clothes. Tap Cold — Tap cold is actually appropriate for most loads of laundry. It’s energy efficient and won’t put any wear and tear on your clothing.
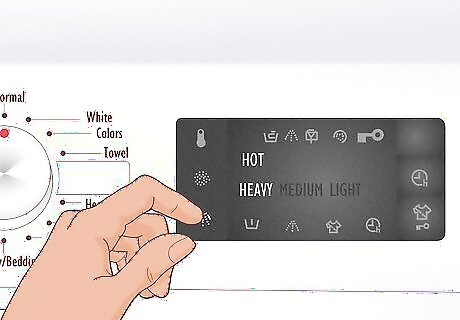
Choose the soil level to set the amount of agitation you want. Like the temperature settings, you’re only able to adjust the agitation setting on certain cycles. Basically, the more agitation you have, the more wear and tear there will be on your clothing, but the cleaner it will be. There are a few things you should know about the Whirlpool agitation levels, though. Heavy — This is basically reserved for the dirtiest version of the toughest clothing. Work gear from oil fields and whatnot. It may destroy more delicate shows. Medium — The medium level is actually fairly strong. It’s not ideal for thinner cotton and polyester unless they’re really dirty. Light — Usually the appropriate level for most loads of everyday laundry. Extra Light — This is ideal for lace and other delicate fabrics, but it’s fine to use this with normal mixed loads, too.
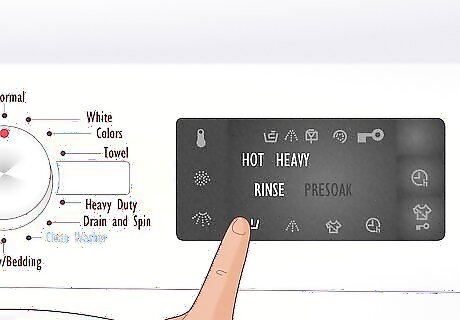
Add any optional rinse or soak settings if they’re necessary. Most Whirlpool models have two unique accessory options for your loads of laundry—“Rinse Options” and “Presoak.” You can typically add these to any cycle. Rise Options allows you to adjust the rinse cycle, while Presoak allows you to add an additional soaking period to your load. The extra soak loads are beneficial if you think your clothes need additional cleaning but you want to avoid adding agitation. Just know that it’s going to add time to each wash load. The extra rinse cycles are usually unnecessary. They will speed up the drying time if you plan on air-drying your clothes, though! You may also want to add a rinse cycle if you’re washing anything that can get waterlogged, like pillows or duvets.
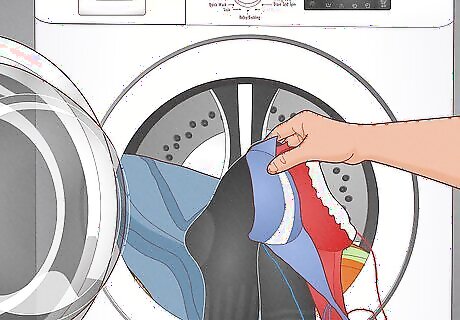
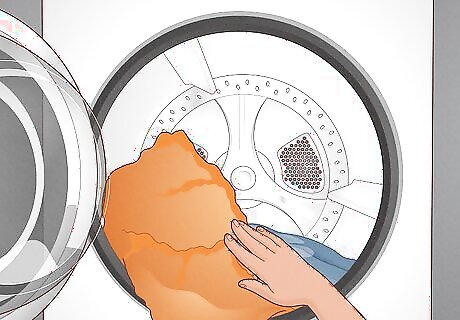
Set the clothes in the drum and run the cycle. Once your cycle settings are selected, set your clothes inside the drum, close the lid, and press the “start” button. You’ll hear the door lid lock and a time will display on the washer. Where the load is in the cycle will be displayed on the little light indicators below the big dial where you set the cycle.
Drying and Folding
Transfer the clothes to the dryer as soon as the wash cycle ends. The longer you leave your clothes in the drum after they’ve been washed, the more likely they are to develop a moist, mildewy odor. Your Whirlpool machine will chime, but it’s not that loud, so set an alarm on your phone that matches the timer of the machine if you aren’t going to be around. Regardless, transfer your clothes whenever the wash cycle ends. The same goes if you plan on air drying your clothes.
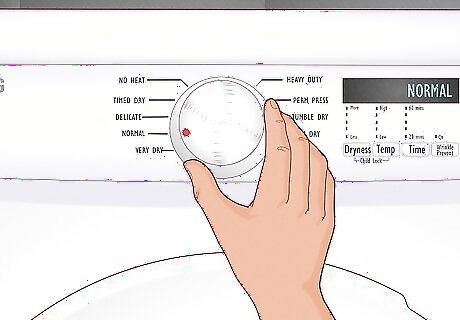
Choose a cycle appropriate for your clothing. Whirlpool machines don’t have any particularly unique dryer settings compared to other brands the way their washing machines do. Still, it’s important to choose a dryer cycle that’s appropriate for your clothing, just like the wash cycle. Generally speaking, here are your options: No Heat or Fluff — This is basically air drying for items with rubber or plastic in them. It’s ideal for bath mats and items like that. Timed Dry —When you select timed dry, use the dial or button under the timeframes to select how long you want to dry your clothes. It’s mainly best for damp loads where you only need 10-20 minutes. Delicates or Less dry — This is a low heat setting that’s ideal for delicates and lightweight fabrics. Normal or Regular — This cycle is medium heat and ideal for the average mixed fabric load. More Dry or Very Dry —A higher temperature setting ideal for bulkier items Heavy Duty or Heavy Dry — An even higher temperature setting designed exclusively for bulky items. Permanent Press or Wrinkle Control — This cycle uses a combination of medium heat and air drying to reduce wrinkles. It’s not going to get especially wet clothing dry. Tumble Dry —This is an alternative to air drying. It uses high speeds in the drum to dry clothes faster than the No Heat or Fluff setting would. Steam Dry — Only available on some models, steam dry is basically a normal dry cycle that adds an extra stream cycle at the end to get rid of wrinkles.
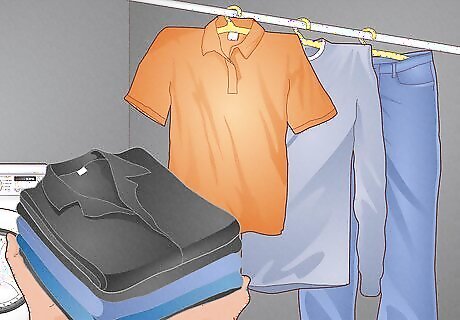
Fold or hang your clothes when they’re done drying. Once the dryer wraps up its cycle, take your clothes out and take them to your room. Fold any clothing you’re putting in a drawer or on a rack. Hang any clothes you want to keep wrinkle-free and readily available. If your clothes are still a little damp at the end of the cycle, use the Timed Dry cycle to dry your clothing a little longer.


Comments
0 comment