

Cleaning Leather Seats
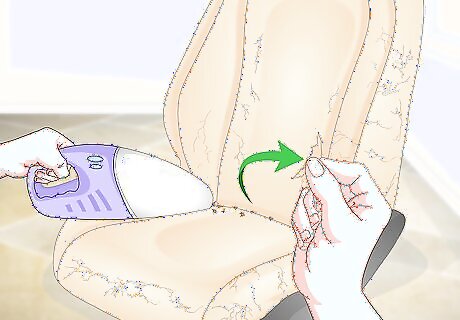
Remove debris from the leather seat and vacuum it clean. Pick up any food scraps or other trash that has accumulated on or behind the leather seat. Depending on the amount and type of dirt on your seat, you may also need to use a feather duster to remove dust. Then, use a vacuum cleaner with a soft brush attachment to remove dirt from hard-to-reach locations. If you try to clean a leather seat with liquid cleaners (e.g., soapy water and leather cleaner) before removing debris and vacuuming, you'll just end up rubbing the dust and dirt into the leather.
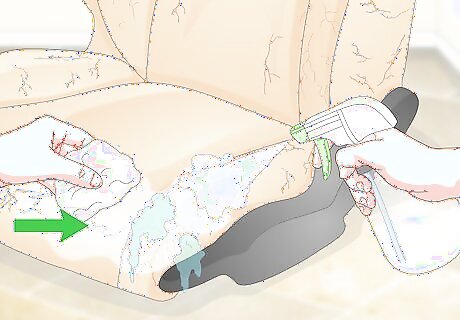
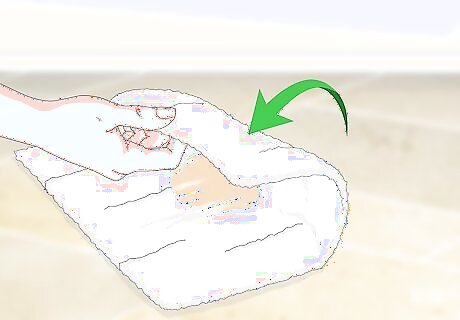
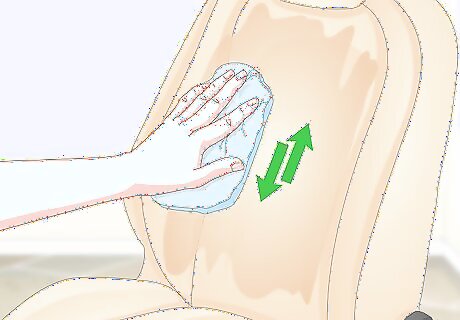
Clean the leather seat with soapy water and a lint-free cloth. Drop 2-3 droplets of bleach-free dish detergent into a plastic spray bottle, and fill the rest of the bottle with water to create a soapy mix. Spray a light layer of soapy water across the surface of your leather seat. Once the seat is damp, use a lint-free cloth (like a microfiber cloth) to wipe the seat until it's dry. As you clean the seat, you'll notice that its color lightens by a shade.
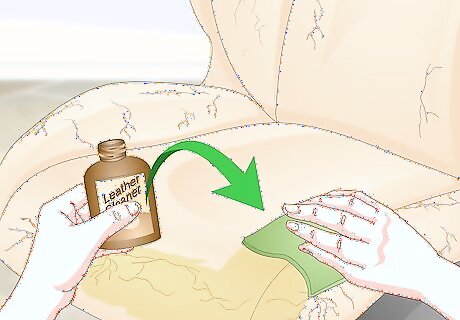
Scrub off dirt and grime with leather cleaner and a coarse scuff pad. If you're still seeing greasy stains on the seat, you can remove them with a scuff pad. Pour about 1–2 tablespoons (15–30 mL) of liquid leather cleaner onto a coarse scuff pad. Then, scrub the saturated section of the pad across the stained leather to wipe off dirt. Keep cleaning the dirty areas until you wipe off the grime. It's okay to apply firm pressure when you're scrubbing the seats clean. You're not likely to damage the leather any more than it already is.
Fixing Minor Cracks
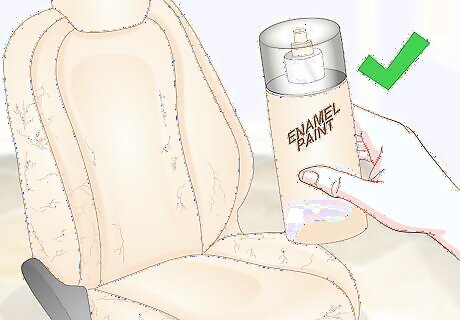
Find a gloss enamel paint that matches the color of your leather. If your cracked leather seats are dyed, it's easy to repair the cracks using an aerosol can of gloss enamel paint. Take a look at the color of the cleaned leather seat. Many leather seats—especially in cars—are dyed red, black, dark blue, or another artificial color. Visit a hobby shop or paint store and peruse their gloss enamel paint selection. Purchase a color of gloss enamel paint that matches your leather. If you were to assess the color of the leather before cleaning it, you'd probably end up picking a paint or dye that's darker than the actual seat color.

Spray a generous amount of aerosol paint onto an old towel. Find an old cotton towel that you don't mind getting dirty, and spray it with the aerosol paint to create a patch about 2 inches (5.1 cm) in diameter. You don't want to completely saturate the towel with paint, but do apply the paint heavily enough that it will easily rub off onto the leather. You can also use an old rag or other scrap of cotton cloth. Make sure it's one that you can throw away once you've finished working on the seats.
Fold the towel in half so the paint is on the inside. If you were to apply the paint directly to the leather seat, it would discolor the leather. To prevent this, fold the towel in half with the paint on the inside. If you have a very thin towel, try folding it over twice (i.e. fold it into quarters) so the paint doesn't bleed through too easily.
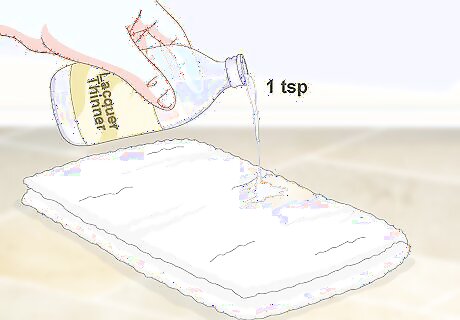
Pour 1 tsp (4.9 mL) of lacquer thinner onto the towel. Aim the lacquer thinner so you're pouring it directly onto the painted section of the towel. Do this over a garage sink or a section of concrete floor that you don't mind staining. Lacquer thinner will help bring up the paint that's already been applied to the leather seats, so that the new paint you're applying blends with the old color. If you were to apply paint to the seat without lacquer thinner, the 2 paint colors wouldn't blend and the cracks in the material would still be very visible.
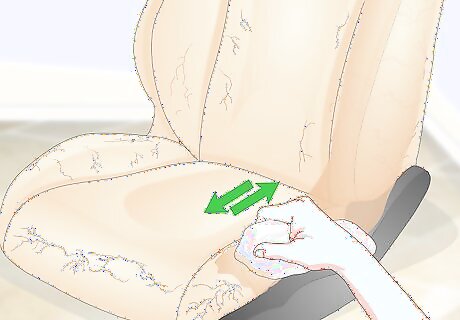
Rub the paint onto the leather seat in long, smooth strokes. Grasp the towel with 3 or 4 fingers just below the section that's saturated with paint and lacquer. Apply the paint and lacquer mixture to the cracked section of your leather seat by rubbing the towel back and forth in strokes each about 8–9 inches (20–23 cm) long. Keep pressure on the towel so the paint and lacquer mix rubs off. Using this technique, rub the towel across the entire cracked area of the leather seat. Avoid rubbing the towel around in circles unless you want permanently visible swirls on your leather seat.
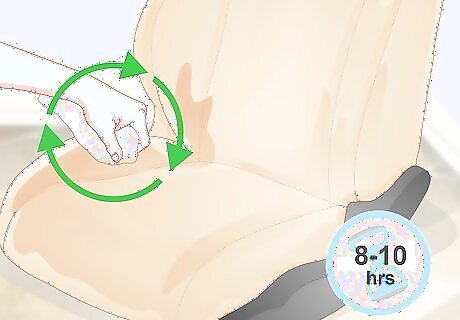
Apply a second layer of paint, then let the seat dry for 8-10 hours. Once you've finished applying paint and lacquer to the entire cracked seat, take a look at the cracks. While they won't be fully filled in, they should be much less visible. If the cracks are still visible, apply more paint and lacquer to the towel, and put on another layer over the cracked portions of the seat. After applying the second layer, let the seats dry for 8–10 hours overnight. It's important that you apply the second layer while the first is still wet, so that the new paint mingles fully with the old coloring in the leather.

Spray a leather conditioner directly onto the seat once the paint is dry. Once the repaired leather has dried, the next step is to apply a sealant to keep the seat from cracking again in a few days. Spray the liquid leather conditioner onto the seat surfaces that you've repaired and recolored. Use a generous amount, since there needs to be enough to soak into all the leather surfaces. Most leather conditioners are sold in plastic spray bottles. If you happen to have bought a leather conditioner that's not in a spray bottle, pour the liquid leather conditioner into an empty spray bottle.
Rub the leather conditioner into the seat with a rag to seal the leather. Pick up a clean rag and rub it across the conditioned leather to massage the liquid conditioner into the leather seat. Keep wiping the seat until the leather has absorbed all of the conditioner. Don't worry about rubbing in a specific pattern, just make sure that you rub all of the conditioner in. Don't use the paint- and lacquer-covered towel for this step, since it would likely smear more paint across the conditioned leather.
Repairing Large Rips
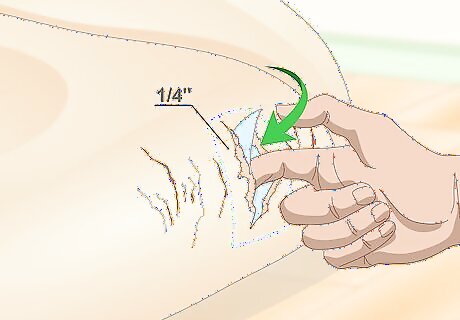
Insert a piece of backing pad that's ⁄4 in (0.64 cm) larger than the rip. A backing pad is a standard part of any leather repair kit. Use a pair of scissors to cut the pad into a square or rectangular shape that's approximately ⁄4 in (0.64 cm) longer than the rip you're repairing. Use a pair of tweezers to carefully slip the piece of backing pad into the hole so it lays flat against the padding under the leather. If a rip is longer than about 1 inch (2.5 cm), it's too large to be repaired with a leather repair kit. You can take it to an automotive repair shop and see if they can fix the torn seat.

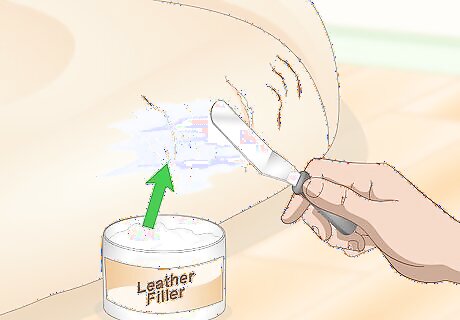
Fill the rip with leather filler and let it cure for 1 hour. Scoop up a large dollop of leather filler using the tip of a palette knife. Use the knife to smear the leather filler into the rip until the backing pad is no longer visible. Then, use your fingers to hold the 2 sides of the rip shut until the leather filler has cured (about 5 minutes). Let the filler set for 1 hour. The backing pad that you've inserted behind the leather will prevent the filler from soaking into the seat filling. Just use your fingers or a handy rag to wipe off any filler that leaks out from the rip. EXPERT TIP Mallika Sharma Mallika Sharma Certified Leather Care Technician Mallika Sharma is a Certified Leather Care Technician and the Founder of The Leather Laundry, a niche spa service for luxury leather gear in India. Mallika specializes in leather cleaning, coloring, repairing, and restoring for shoes, handbags, jackets, wallets, belts, and sofas. She holds a Master’s degree in Finance and Investment from the University of Edinburgh Business School. Mallika is a certified Professional Leather Care Technician and trained with the globally reputed leather care company, LTT in the United Kingdom. Mallika Sharma Mallika Sharma Certified Leather Care Technician Fill leather holes before coloring them. Small holes, tears, cracks, or other damage in leather can be filled in and patched up using a special filler cream or putty. Once the damaged area is filled and smoothed out, use a tiny fiber tip brush or applicator to gently blend leather dye, paint, or pigment over the patched area in a color that closely matches the surrounding material.
Rub small dabs of leather filler onto other cracks with a palette knife. While you're waiting for the large rip to set, use your palette knife and the leather filler to patch up large cracks surrounding the rip. Start with a tiny dollop, and rub the filler into cracks until they're flush with un-cracked portions of the leather seat. When you've finished applying the filler, give it 1 hour to set. Since the leather isn't ripped through in the cracked locations, you don't need to insert backing pad behind the leather. It's okay if you get filler all over the seat; you'll be coloring the entire seat anyway.
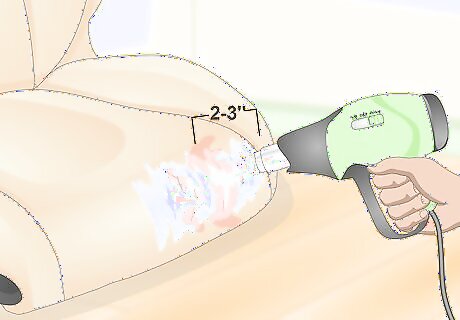
Set the filler from 2–3 in (5.1–7.6 cm) away with a heat gun. Plug in your heat gun and set it to the on the hottest setting. Once hot air is blowing out, hold the heat gun 2–3 inches (5.1–7.6 cm) away from the portions of the leather seat that you've applied filler to. Move the heat gun back and forth above the leather seat for about 5-7 minutes. Lightly tap the seat with your finger to make sure it's dry. This will dry the filler and help it to set quickly. Don't attempt to dye the leather until after the filler is completely dry.
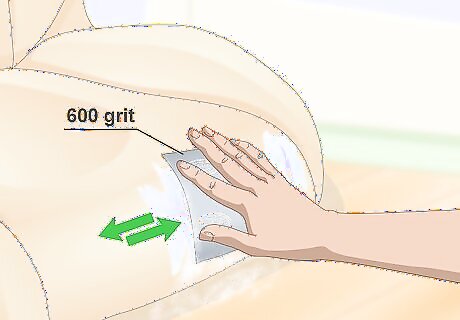
Sand the dried leather filler until it's smooth with 600-grit sandpaper. Take a sheet of very fine sandpaper and move it across the dried and filled section of leather. Use strokes about 6 inches (15 cm) long, and take care to only move the sandpaper in 1 direction. Never rub the sandpaper around in circles or back and forth. After sanding, wipe the dust away with a damp rag. 600-grit is an extremely fine sandpaper. This will smooth out the set and dried filler without cracking it or leaving large abrasions behind. If you applied an excessive amount of filler previously, the sand paper will even out those spots.

Apply a second layer of leather filler once the leather is smooth. Seriously ripped and cracked leather seats will need 2 layers of leather filler to smooth out the damaged material. Take your palette knife and scoop out more of the gooey filler material. As before, spread it across the cracked areas of the leather. Make sure to apply more filler over any rips you repaired, as well. As before, let the leather filler set for 1 hour once you've finished applying it. Once the hour has passed, dry the second layer of filler with the heat gun for 5-6 minutes.
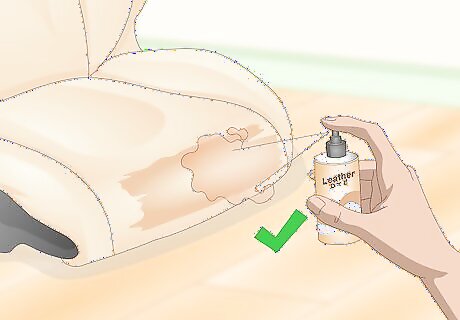
Spray a coat of leather dye across the repaired leather seat. This will be simplest if you've purchased a leather dye in an aerosol spray can. Spray the dye across the seat, moving the spray canister in a back-and-forth motion. Keep applying dye until the seats have been uniformly coated and the entire surface of the leather is all the same color. If the leather has an uncommon color, take a photo of the seat and bring the picture to the hobby shop with you when you go to select a paint or leather dye.
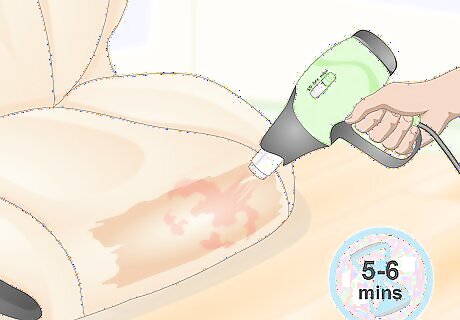
Set and dry the paint for 5–6 minutes with the heat gun. Once you've covered the full repaired section of leather seat with dye, it's time to dry the paint. As before, set the heat gun to its highest setting. Blow hot air onto the dyed leather sections from about 4 inches (10 cm) away. Keep it up for about 5 minutes until the dye is dry. Lightly tap the dyed sections of the leather seat with 1 finger to make sure they're dry. If you're spraying paint on leather car seats, hold a piece of cardboard behind


Comments
0 comment